The Site to Site IPSec VPN
On this page, you can find an explanation of how to configure Site to Site IPSec connection between the Cloud Console Regions.
Table of contents
Prerequisites
- Create a private network in each region. How to create a network see the articles - Networks and Subnets
- Create two VMs in private and public networks based on Ubuntu 18.04 or higher in each region. How to create VMs see the article - Virtual Machines
- For testing, need to create on each private network VM based on Windows or Linux
Configure Site to Site IPSec connection
Example network topology:
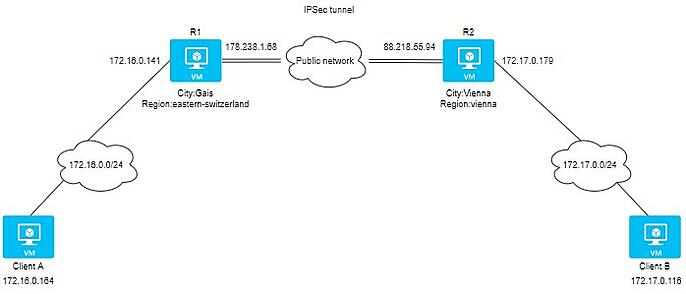
Details of 2 sites:
Site A:
Location: Gais, Switzerland
External IP: 178.238.1.68
Internal IP: 172.16.0.141
Site B:
Location: Vienna, Austria
External IP: 88.218.54.237
Internal IP: 172.17.0.179
Prerequisites for both VPN routers:
- Update your repository indexes and install Strongwan:
apt update && sudo apt upgrade -y
apt install strongswan -y
- Add the following kernel parameters:
cat >> /etc/sysctl.conf << EOF
net.ipv4.ip_forward = 1
net.ipv4.conf.all.accept_redirects = 0
net.ipv4.conf.all.send_redirects = 0
EOF
- Apply kernel parameters:
sysctl -p /etc/sysctl.conf
- Create a preshared key that will use on both VPN routers:
openssl rand -base64 64
zfZL9********3E3EJew
Configure Site A:
- Add the following string to file /etc/ipsec.secrets
cat /etc/ipsec.secrets
# source      destination
178.238.1.68 88.218.54.237 : PSK "zfZL9BtqVvCOD/zdvY4BMoDxMhUePPBS+DYxhGphXMqUZhTtMM5PEZS8zDBc3b1Vjdhev2exaPnXq+o3E3EJew"
- Add VPN configuration in /etc/ipsec.conf
cat /etc/ipsec.conf
# basic configuration
config setup
        charondebug="all"
        uniqueids=yes
        strictcrlpolicy=no

# connection to amsterdam datacenter
conn gais-to-vienna
        authby=secret
        left=%defaultroute
        leftid=178.238.1.68
        leftsubnet=172.16.0.141/24
        right=88.218.55.94
        rightsubnet=172.17.0.179/24
        ike=aes256-sha2_256-modp1024!
        esp=aes256-sha2_256!
        keyingtries=0
        ikelifetime=1h
        lifetime=8h
        dpddelay=30
        dpdtimeout=120
        dpdaction=restart
        auto=start
Configure Site B:
- Add the following string to file /etc/ipsec.secrets
cat /etc/ipsec.secrets
# source      destination
88.218.54.237 178.238.1.68 : PSK "zfZL9BtqVvCOD/zdvY4BMoDxMhUePPBS+DYxhGphXMqUZhTtMM5PEZS8zDBc3b1Vjdhev2exaPnXq+o3E3EJew"
- Add VPN configuration in /etc/ipsec.conf
cat /etc/ipsec.conf
# basic configuration
config setup
        charondebug="all"
        uniqueids=yes
        strictcrlpolicy=no

# connection to amsterdam datacenter
conn vienna-to-gais
        authby=secret
        left=%defaultroute
        leftid=88.218.55.94
        leftsubnet=172.17.0.179/24
        right=178.238.1.68
        rightsubnet=172.16.0.194/24
        ike=aes256-sha2_256-modp1024!
        esp=aes256-sha2_256!
        keyingtries=0
        ikelifetime=1h
        lifetime=8h
        dpddelay=30
        dpdtimeout=120
        dpdaction=restart
        auto=start
Start the VPN on both ends:
sudo ipsec restart
Get the status of the tunnel Site A:
sudo ipsec status
Security Associations (1 up, 0 connecting):
gais-to-vienna[294]: ESTABLISHED 4 minutes ago, 178.238.1.68[178.238.1.68]...88.218.55.94[88.218.55.94]
gais-to-vienna{285}: INSTALLED, TUNNEL, reqid 284, ESP SPIs: cdb16354_i c750e920_o
gais-to-vienna{285}: 172.16.0.0/24 === 172.17.0.0/24
Get the status of the tunnel Site B:
sudo ipsec status
Security Associations (1 up, 0 connecting):
vienna-to-gais[292]: ESTABLISHED 8 minutes ago, 88.218.55.94[88.218.55.94]...178.238.1.68[178.238.1.68]
vienna-to-gais{285}: INSTALLED, TUNNEL, reqid 284, ESP SPIs: c750e920_i cdb16354_o
vienna-to-gais{285}: 172.17.0.0/24 === 172.16.0.0/24
Set the service to start on boot:
$ sudo systemctl enable strongswan
Strongswan useful commands
- Start / Stop / Status:
sudo ipsec up connection-name
sudo ipsec down connection-name
sudo ipsec restart
sudo ipsec status
sudo ipsec statusall
- Get the Policies and States of the IPsec Tunnel:
sudo ip xfrm state
sudo ip xfrm policy
- Reload the secrets, while the service is running:
sudo ipsec rereadsecrets
Capture traffic
To capture traffic from the tunnel, use the command:
sudo tcpdump esp
Disable port-security
To disable port-security in internal networks for VPN routers and clients, do the following:
Create API user and install OpenStack CLI. To find more detailed instructions see the article - Installation OpenStack CLI.
In each region need to create its own API user.
This example shows how to disable port security in Eastern-Switzerland region.Show port list:
openstack port list
+--------------------------------------+------+-------------------+-----------------------------------------------------------------------------+--------+
| ID | Name | MAC Address | Fixed IP Addresses | Status |
+--------------------------------------+------+-------------------+-----------------------------------------------------------------------------+--------+
| 0648a6fe-0f82-421e-8788-a3bc6ba44f14 | | fa:16:3e:36:5d:1c | ip_address='172.16.0.101', subnet_id='4494fca5-92ba-4831-8522-effa5256b8db' | ACTIVE |
| 4eb09249-7800-46a1-82b5-d739af048313 | | fa:16:3e:65:05:f3 | ip_address='172.16.0.100', subnet_id='4494fca5-92ba-4831-8522-effa5256b8db' | ACTIVE |
| 5e1a6b90-bc0e-40a1-811a-d20ff956fa42 | | fa:16:3e:ee:4a:66 | ip_address='172.16.0.102', subnet_id='4494fca5-92ba-4831-8522-effa5256b8db' | ACTIVE |
| 5eaed158-bd0b-4e9e-88d2-7c94c124efae | | fa:16:3e:b8:9f:bf | ip_address='172.16.0.164', subnet_id='4494fca5-92ba-4831-8522-effa5256b8db' | ACTIVE |
| 681ab50b-31ee-4008-b378-353fc132adbb | | fa:16:3e:42:2a:75 | ip_address='178.238.1.68', subnet_id='d447edae-1d21-4f83-9f67-2060ddb5930a' | ACTIVE |
| 72828020-8826-4bd0-b99d-d014685678dd | | fa:16:3e:22:22:ea | ip_address='172.16.0.141', subnet_id='4494fca5-92ba-4831-8522-effa5256b8db' | ACTIVE |
| bfe1bd7c-3192-4170-9cc9-bdf011cdc585 | | fa:16:3e:95:d0:33 | ip_address='178.238.2.48', subnet_id='d447edae-1d21-4f83-9f67-2060ddb5930a' | ACTIVE |
+--------------------------------------+------+-------------------+-----------------------------------------------------------------------------+--------+
- Copy IDs of needed ports and execute the following commands. In our case, it is a port with IP 172.16.0.164 - ClientA and 172.16.0.141 - R1:
openstack port set 5eaed158-bd0b-4e9e-88d2-7c94c124efae --disable-port-security
openstack port set 72828020-8826-4bd0-b99d-d014685678dd --disable-port-security
Preparing client side
Client A :
- Check connection with R1:
ping 172.16.0.141

Pinging 172.16.0.141 with 32 bytes of data:
Reply from 172.16.0.141: bytes=32 time<1ms TTL=64
Reply from 172.16.0.141: bytes=32 time<1ms TTL=64
Reply from 172.16.0.141: bytes=32 time<1ms TTL=64
Reply from 172.16.0.141: bytes=32 time<1ms TTL=64

Ping statistics for 172.16.0.141:
Packets: Sent = 4, Received = 4, Lost = 0 (0% loss),
Approximate round trip times in milli-seconds:
Minimum = 0ms, Maximum = 0ms, Average = 0ms
- Add route about network 172.17.0.0/24 via R1:
route ADD 172.17.0.0 MASK 255.255.255.0 172.16.0.141
- Check routing table:
route print

172.16.0.255 255.255.255.255 On-link 172.16.0.164 271
172.17.0.0 255.255.255.0 172.16.0.141 172.16.0.164 16
178.238.0.0 255.255.252.0 On-link 178.238.2.48 271
178.238.2.48 255.255.255.255 On-link 178.238.2.48 271
178.238.3.255 255.255.255.255 On-link 178.238.2.48 271
224.0.0.0 240.0.0.0 On-link 127.0.0.1 331
224.0.0.0 240.0.0.0 On-link 178.238.2.48 271
224.0.0.0 240.0.0.0 On-link 172.16.0.164 271
255.255.255.255 255.255.255.255 On-link 127.0.0.1 331
255.255.255.255 255.255.255.255 On-link 178.238.2.48 271
255.255.255.255 255.255.255.255 On-link 172.16.0.164 271
Client B :
- Check connection with R2:
ping 172.17.0.179

Pinging 172.17.0.116 with 32 bytes of data:
Reply from 172.17.0.179: bytes=32 time<1ms TTL=64
Reply from 172.17.0.179: bytes=32 time<1ms TTL=64
Reply from 172.17.0.179: bytes=32 time<1ms TTL=64
Reply from 172.17.0.179: bytes=32 time<1ms TTL=64

Ping statistics for 172.17.0.179:
Packets: Sent = 4, Received = 4, Lost = 0 (0% loss),
Approximate round trip times in milli-seconds:
Minimum = 0ms, Maximum = 0ms, Average = 0ms
- Add route about network 172.16.0.0/24 via R2:
route ADD 172.16.0.0 MASK 255.255.255.0 172.17.0.179
- Check routing table:
route print

172.16.0.0 255.255.255.0 172.17.0.179 172.17.0.116 16
172.17.0.0 255.255.255.0 On-link 172.17.0.116 271
172.17.0.116 255.255.255.255 On-link 172.17.0.116 271
172.17.0.255 255.255.255.255 On-link 172.17.0.116 271
224.0.0.0 240.0.0.0 On-link 127.0.0.1 331
224.0.0.0 240.0.0.0 On-link 88.218.54.237 271
224.0.0.0 240.0.0.0 On-link 172.17.0.116 271
255.255.255.255 255.255.255.255 On-link 127.0.0.1 331
255.255.255.255 255.255.255.255 On-link 88.218.54.237 271
255.255.255.255 255.255.255.255 On-link 172.17.0.116 271
Verifying connectivity
To verify connectivity between Client A and Client B, do the following:
- Ping from Client B to Client A:
ping 172.16.0.164

Pinging 172.16.0.164 with 32 bytes of data:
Reply from 172.16.0.164: bytes=32 time=25ms TTL=126
Reply from 172.16.0.164: bytes=32 time=25ms TTL=126
Reply from 172.16.0.164: bytes=32 time=25ms TTL=126
Reply from 172.16.0.164: bytes=32 time=26ms TTL=126
- Traceroute from Client B to Client A:
tracert -d 172.16.0.164

Tracing route to 172.16.0.164 over a maximum of 30 hops

1 <1 ms <1 ms <1 ms 172.17.0.179
2 25 ms 25 ms 25 ms 172.16.0.141
3 26 ms 25 ms 25 ms 172.16.0.164