Advanced network scenarios
On this page we will discuss scenarios, that can help you to build software upgrade friendly and fault-tolerant cloud infrastructure.
Most of the topics described below considered advanced. Basic Linux and Networking skills are required. Please contact support if you need guidance and best practices for your specific use case.
Most of the features described below are in beta state, thus not available at the Console portal, and can be configured through CLI and IaC tools like Terraform and Ansible.
Table of contents
Prerequisites
- CLI User created. To find more detailed instructions see the article - CLI Users.
- Openstack Client Configured. To find more detailed instructions see the article - Installation OpenStack CLI.
Port Migration
Port migration can be used in drop-in replacement of instances in case of major software upgrades or recovery scenarios, especially when you need to preserve initial networking settings and you didn’t plan for such actions in advance by leveraging Floating IPs or Load Balancers.
Scenarios:
- Install and configure new instance nearby to old one, verify internally that it works as expected and then switch production traffic to it with preserving ability to rollback to previous version (instance).
- In case of major failures - restore instance from backup and leverage previously used IP.
Configuration
Make sure that CLI user has SSH key:openstack key list
Create SSH key if needed:openstack key create --public-key .ssh/id_rsa.pub ssh_key_name
Create ports for your planned servers:openstack port create --network public server-1-portopenstack port create --network public server-2-port
Choose images and flavors for servers:openstack image listopenstack flavor list
Create servers with corresponding ports:
openstack server create \
--image 'centos-8.2-2004' \
--boot-from-volume 100 \
--flavor VC-4 \
--security-group default \
--port server-1-port \
--key-name ssh_key_name \
server1

openstack server create \
--image 'centos-8.2-2004' \
--boot-from-volume 100 \
--flavor VC-4 \
--security-group default \
--port server-2-port \
--key-name ssh_key_name \
server2
Verify created servers:openstack server listopenstack port list
Optionally:
Install Nginx web server on server1 and Apache on server2 and configure firewall rule to allow TCP port 80 from your workstation:
- Centos:
- Server1:
yum install nginxsystemctl enable nginxsystemctl start nginx - Server2:
yum install httpdsystemctl enable httpdsystemctl start httpd
- Server1:
- Ubuntu:
- Server1:
apt updateapt install nginxsystemctl enable nginxsystemctl start nginx - Server2:
apt install apache2systemctl enable apache2systemctl start apache2
Verify that IP addres of server-1-port is served by nginx webserver and IP addres of server-2-port served by Apache:curl <IP addres of server-1-port>curl <IP addres of server-2-port>
- Server1:
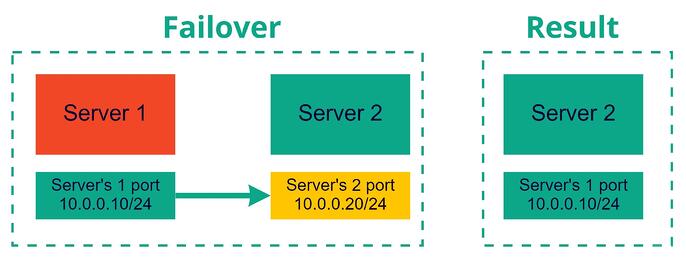
Perform failover.
- Detaching ports from servers:
openstack server remove port <server> <port>
openstack server remove port server1 server-1-port
openstack server remove port server2 server-2-port
- Attaching port of server1 to server2 and vice versa:
openstack server add port <server> <port>
openstack server add port server1 server-2-port
openstack server add port server2 server-1-port
- Reboot servers if needed:
openstack server reboot server1
openstack server reboot server2
- Verify that ports were switched:
openstack server list
openstack port list
Optionally:
Verify that IP address of server-1-port is now served by Apache webserver and IP address of server-2-port is now served by Nginx web servers. It will mean that we successfully switched ports of our servers.curl <IP addres of server-1-port>curl <IP addres of server-2-port>
Pro Tips:
Use “–fixed-ip” argument during port creation for better control of IP allocation in private networks e.g.:
openstack port create --network <network_name> --fixed-ip subnet=<subnet_name>,ip-address=<ip_address> <port_name>
e.g.:openstack port create --network network1 --fixed-ip subnet=subnet1,ip-address=10.0.0.10 server-1-portYou can assign multiple ports to one instance e.g.:
openstack server add port server1 server-1-portopenstack server add port server1 server-2-portRemove IP address from port:
openstack port set --no-fixed-ip <port_id>
e.g.:openstack port set --no-fixed-ip 68c763c4-d523-4a47-baf9-XXXXXXXXXXXXAssign Desired IP to port:
openstack port set --fixed-ip subnet=<subnet_name>,ip-address=<ip_address> <port_id>
e.g.:openstack port set --fixed-ip subnet=subnet1,ip-address=10.0.0.10 68c763c4-a293-68f9-anr6-XXXXXXXXXXXXAssign multiple IP addresses to one port:
openstack port set --fixed-ip subnet=subnet1,ip-address=10.0.0.11 68c763c4-a293-68f9-anr6-XXXXXXXXXXXXopenstack port set --fixed-ip subnet=subnet1,ip-address=10.0.0.12 68c763c4-a293-68f9-anr6-XXXXXXXXXXXXopenstack port set --fixed-ip subnet=subnet1,ip-address=10.0.0.13 68c763c4-a293-68f9-anr6-XXXXXXXXXXXXYou can use a custom MAC address for port. Contact support if you need it.
This scenario is very complex and heavily affected by OS settings inside instance.
Binding to MAC addresses in your network configuration tool (Netplan, systemd-networkd, others) can cause networking failure.
Routing table affected by new/changed network interfaces can cause networking failure.
Firewalls with strict rules can cause networking failure.
Please. test this scenario in advance in Non-production environment.
Conclusion
As you can see, the port modification functionality is very powerful and let you similar functionality with what you can do with physical devices and even beyond that. But as a drawback, it leads to complexity and difficulties in configurations on many levels. We recommend avoiding working directly with ports and consider the usage of more advanced features like Floating IPs and Load Balancers except for cases when you really need it.
Floating IP
Floating IP is an IP address allocated from Public network range by request and associated with specific project. You can assign Floating IP to any of your instances provisioned in private networks. This provides great flexibility in management of your network resources.
Some of the key advantages provided by Floating IPs:
- Once Floating IP created - it will stay in your project until you explicitly delete it. Regardless if you delete resources to which it attached. It guarantees that you will have your stable static IP for as long as it needed for your infrastructure.
- You can create multiple Floating IPs per project.
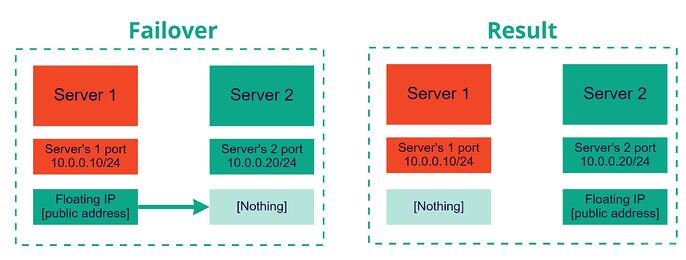
- You can almost immediately transfer Floating IP from one instance to another without any interruptions to service.
- Instance itself doesn’t know about Floating IP existence. You don’t have additional network interface on OS level. You don’t need to care about routing with multiple interfaces.
You need to know that:
- Floating IP can be assigned only to instance provisioned in private network with configured router with external gateway.
- Only one Floating IP can be assigned to instance at one time.
- You can’t have Floating IP created from range of your private network.
Configuration
Create private network:openstack network create private
Create and configure subnet:
openstack subnet create \
--gateway 10.0.0.1 \
--dns-nameserver 8.8.8.8 \
--subnet-range 10.0.0.0/24 \
--allocation-pool start=10.0.0.10,end=10.0.0.200 \
--network private \
private_subnet
Create router to let instances in private network access to internet:openstack router create private_gateway
Configure gateway for router:openstack router set --external-gateway public private_gateway
Attach router to private subnet (enable routing):openstack router add subnet private_gateway private_subnet
Create a couple of servers in private network:
openstack server create \
--image 'centos-8.2-2004' \
--boot-from-volume 100 \
--flavor VC-4 \
--security-group default \
--network private \
--key-name ssh_key_name \
server1

openstack server create \
--image 'centos-8.2-2004' \
--boot-from-volume 100 \
--flavor VC-4 \
--security-group default \
--network private \
--key-name ssh_key_name \
server2
Make sure that servers created in private subnet range and you can’t connect to it over internet:openstack server list
Create floating IP:openstack floating ip create public
Show list of floating IPs available:openstack floating ip list
Assign Floating IP to server1:#openstack server add floating ip server1 <floating_ip_address>openstack server add floating ip server1 88.218.52.5
Verify that you can connect to server1 over internet using Floating IP address.
Make sure that you allowed SSH access on Cloud Console Firewall - to find more
detailed instructions see the article - Firewall Rules:#ssh centos@<floating_ip_address>ssh centos@88.218.52.5
Reassign Floating IP to server2:#openstack server add floating ip server2 <floating_ip_address>openstack server add floating ip server2 88.218.52.5
Connect to the same Floating IP over SSH and make sure that you are now accessing server2 instead of server1 using the very same address:#ssh centos@<floating_ip_address>ssh centos@88.218.52.5
Delete server2 and verify that Floatin IP still exists in your project and can be reused:openstack server delete server2openstack floating ip list
Assign Floating IP to server1:#openstack server add floating ip server1 <floating_ip_address>openstack server add floating ip server1 88.218.52.5openstack floating ip list
Unassign Floating IP from Any servers:#openstack server remove floating ip server1 <floating_ip_address>openstack server remove floating ip server1 88.218.52.5openstack floating ip list
Conclusion
Floating IP is a great addition to your infrastructure. It’s simple to use. It let you great flexibility in performing drop-in replacement of instances. It guarantees you the stability of the IP address - once you created it will be yours until explicit termination. It can highly increase your security by running all of your workload inside a private network still being able to access the environment using jump servers with adding Public IP only for a limited time (maintenance) and others.
Load Balancer
Load balancer is a feature designed to satisfy the needs of the most complex and modern distributed application architectures. It helps to increase the performance of your application by distributing requests over multiple instances based on the chosen algorithm as well as reduce possible interruption to service caused by failed instances by leveraging instance auto-eviction functionality based on health probes.
Configuration
Create and configure network:
openstack network create private

openstack subnet create \
--gateway 10.0.0.1 \
--dns-nameserver 8.8.8.8 \
--subnet-range 10.0.0.0/24 \
--allocation-pool start=10.0.0.10,end=10.0.0.200 \
--network private \
private_subnet

openstack router create private_gateway
openstack router set --external-gateway public private_gateway
openstack router add subnet private_gateway private_subnet
Create a couple of servers in private network so we can test Load Balancer.
This time we will leverage User Data a.k.a. Cloud-Init feature for automatic preconfiguration of software inside newly created instance without need to login to it.
Prepare Cloud-Init config (adjust for your OS Distro accordingly):
cat << EOF > ./server1.yaml
#cloud-config
runcmd:
- yum install -y nginx
- systemctl start nginx
EOF

cat << EOF > ./server2.yaml
#cloud-config
runcmd:
- yum install -y httpd
- systemctl start httpd
EOF
Config of server1.yaml will install and start Nginx webserver on server1. Config of server2.yaml will install and enable Apache web server on server2:
openstack server create \
--image 'centos-8.2-2004' \
--boot-from-volume 100 \
--flavor VC-4 \
--security-group default \
--network private \
--key-name ssh_key_name \
--user-data ./server1.yaml \
server1

openstack server create \
--image 'centos-8.2-2004' \
--boot-from-volume 100 \
--flavor VC-4 \
--security-group default \
--network private \
--key-name ssh_key_name \
--user-data ./server2.yaml \
server2
Now we have two servers with different web servers which listen on the same port. Both of them inside a private network therefore not reachable from the internet.
Create Load Balancer
Use the next command to create Load Balancer:penstack loadbalancer create --name web --vip-subnet-id private_subnet
Create Load Balancer Listener:
openstack loadbalancer listener create \
    --name web_listener \
    --protocol HTTP \
    --protocol-port 80 \
    web
Create Load Balancer Pool:
openstack loadbalancer pool create \
    --name web_pool \
    --lb-algorithm ROUND_ROBIN \
    --listener web_listener \
    --protocol HTTP
Get servers ip:
openstack server list
+--------------------------------------+---------+--------+--------------------+--------------------------+--------+
| ID | Name | Status | Networks | Image | Flavor |
+--------------------------------------+---------+--------+--------------------+--------------------------+--------+
| a1cb4833-c542-4cd4-b980-XXXXXXXXXXX  | server2 | ACTIVE | private=10.0.0.193 | N/A (booted from volume) | VC-4 |
| f4bb4bcd-6366-4bcd-83fa-XXXXXXXXXXX  | server1 | ACTIVE | private=10.0.0.19  | N/A (booted from volume) | VC-4 |
+--------------------------------------+---------+--------+--------------------+--------------------------+--------+
Add web servers/instances to Load Balancer’s pool (use your IP addresses):
openstack loadbalancer member create \
    --subnet-id private_subnet \
    --address 10.0.0.19 \
    --protocol-port 80 \
    web_pool

openstack loadbalancer member create \
    --subnet-id private_subnet \
    --address 10.0.0.193 \
    --protocol-port 80 \
    web_pool
Now we have preconfigured instances with installed and enabled web servers, created and configured Load Balancer, but everything is exposed only to internal network, let’s fix that by adding Floating IP to our infrastructure:openstack floating ip create public
Get IP address of Load Balancer listener:
openstack loadbalancer list
+--------------------------------------+------+----------------------------------+-------------+---------------------+----------+
| id | name | project_id | vip_address | provisioning_status | provider |
+--------------------------------------+------+----------------------------------+-------------+---------------------+----------+
| ae2a65e5-293f-455d-8cb8-XXXXXXXXXXXX | web | 17a1fd0e5a87468da287XXXXXXXXXXXX | 10.0.0.48 | ACTIVE | amphora |
+--------------------------------------+------+----------------------------------+-------------+---------------------+----------+
Get Port ID of Load Balancer listener:
openstack port list | grep 10.0.0.48
| 71292fef-7a94-43ac-bfe3-XXXXXXXXXXXX  | octavia-lb-ae2a65e5-293f-455d-8cb8-XXXXXXXXXXXX  | fa:16:3e:XX:XX:XX | ip_address='10.0.0.48', subnet_id='9efbdfb3-f86d-40f0-b07a-XXXXXXXXXXXX ' | DOWN |
Assign Previously created Floating IP to Load balancer’s Listener port:
openstack floating ip set --port 71292fef-7a94-43ac-bfe3-XXXXXXXXXXXX <floating_ip_address>
Pro Tips:
Despite you can create Load Balancer directly in Public network, we highly recommend using of Floating IP’s instead. This will dramatically increase your flexibility in upgrade/migration/disaster recovery scenarios but will keep all of the benefits of Load Balancer itself.
As result we have:
- Internal network with subnet;
- Router which let instances access to internet;
- Preconfigured instances with automatically installed web servers;
- Fully configured Load Balancers with pool members of two web servers;
- Floating IP attached to Load Balancer which exposes web services to internet over port 80.
Test Load balancer Functionality:
curl http://<floating_ip_address>
curl http://<floating_ip_address>
As we configured Load Balancer to work using Round Robin algorithm expected result - different responses on each HTTP request. This means that Load Balancer equally distributes traffic between all pool members.
It’s recommended to use curl instead of your Browser for testing purposes because the Browsers caching mechanism can mess results.
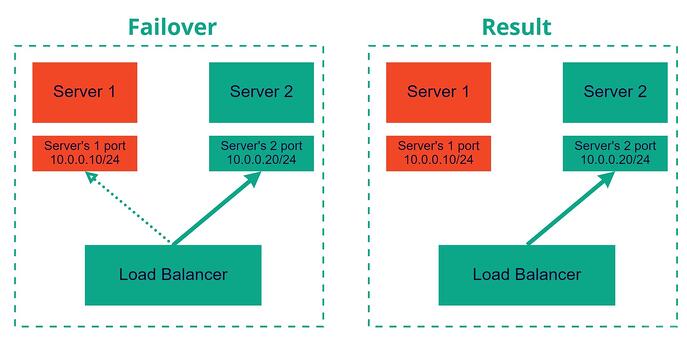
Now let’s disable one of the web servers. You can shutdown instance or disable web server.
Expected result - you will always receive response only from one web server because Load Balancer will automatically detect that backend instance is down.
Restore your “broken” webserver and verify that now you receive results again from both web servers (Apache and Nginx).
Change Load Balancer’s algorithm.
Some applications may benefit from accepting client requests to the same instance instead of distribution across all instances:openstack loadbalancer pool set --lb-algorithm SOURCE_IP web_pool
Verify that Load Balancer’s behavior changed:
curl http://<floating_ip_address>
curl http://<floating_ip_address>
curl http://<floating_ip_address>
You should always receive results only from the same server.
Supported LB Algorithms:
- SOURCE_IP;
- ROUND_ROBIN;
- LEAST_CONNECTIONS;
- SOURCE_IP_PORT;
In addition, Load Balancers has a much more broad functionality than it was described above. It supports multiple pools, multiple listeners, SSL offloading, advanced monitors, and other what will be described in Load Balancers dedicated documentation.
Conclusion
Load Balancer is a powerful and advanced feature that can enhance multiple aspects of your application starting but not limiting with traffic distribution, fault detection, smooth adding, and removing instances from pools/farms/clusters. In conjunction with private networks, routers, and Floating IP it can become a great entry point for your application.