Integrated S3-Browser
On this page, you can find an explanation of how to use Object Storage with its integrated S3-Browser in the Cloud Console, how to create and delete buckets, how to navigate through folders and files, upload and download files and instructions for other steps to manage an Object Storage effectively in the Cloud Console.
Table of contents
- Table of contents
- Introduction
- S3 Buckets page
- Create bucket
- Browse folders and files within a bucket
- Create folder
- Upload file
- Download file
- Make bucket public
- Get bucket’s public URL
- Get object’s public URL
- Make bucket private
- Enable/suspend bucket versioning
- Delete and multi-delete objects
- Set bucket retention policy
- Delete bucket
Introduction
In the Cloud Console, you have the option to use Object Storage with its integrated S3-Browser, which offers essential Object Storage functionality.
With our S3 browser, you can perform the following actions:
- Browse already created buckets and the files stored within them, even if they were created using different APIs or third-party tools;
- Create new buckets;
- Delete buckets;
- Set a bucket to private or public access;
- Navigate through folders and files inside a bucket;
- Create a folder structure inside a bucket;
- Upload files to a bucket;
- Download separate files from the buckets;
- Delete files from a bucket;
- Obtain public links for buckets, folders, and individual files;
- Configure versioning for buckets to keep multiple versions of the same object;
- Set retention policies for automatic cleanup of older files.
This integrated S3 browser provides an efficient and user-friendly way to manage your Object Storage resources within the Cloud Console. Before we start using the integrated S3-Browser, we need to create Object Storage credentials that include the access key and secret key.
💡 To find instructions on how to create Object Storage Credentials in the Cloud Console, please, see the article - Object Storage Credentials
S3 Buckets page
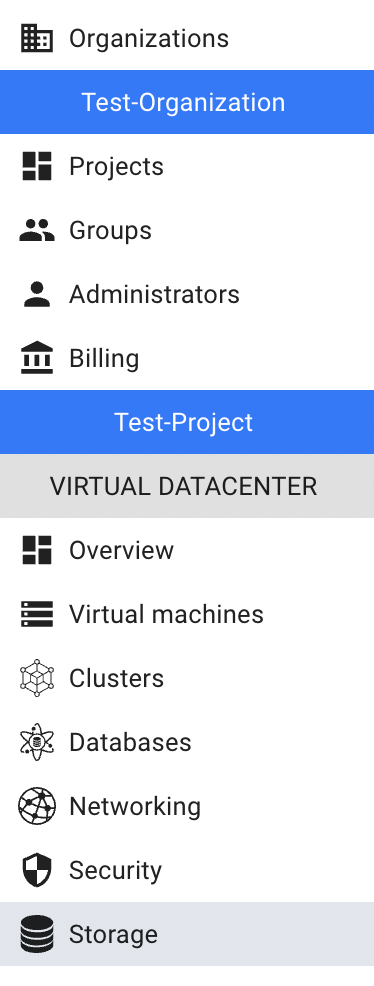
To get inside the integrated S3-Browser select the Storage from the VIRTUAL DATACENTER block in the side-bar menu and click the S3 Browser TAB:

These actions will redirect you to the Object Storage Credentials page, and if you have already created Object Storage Credentials, you will have the BROWSE BUCKETS button available: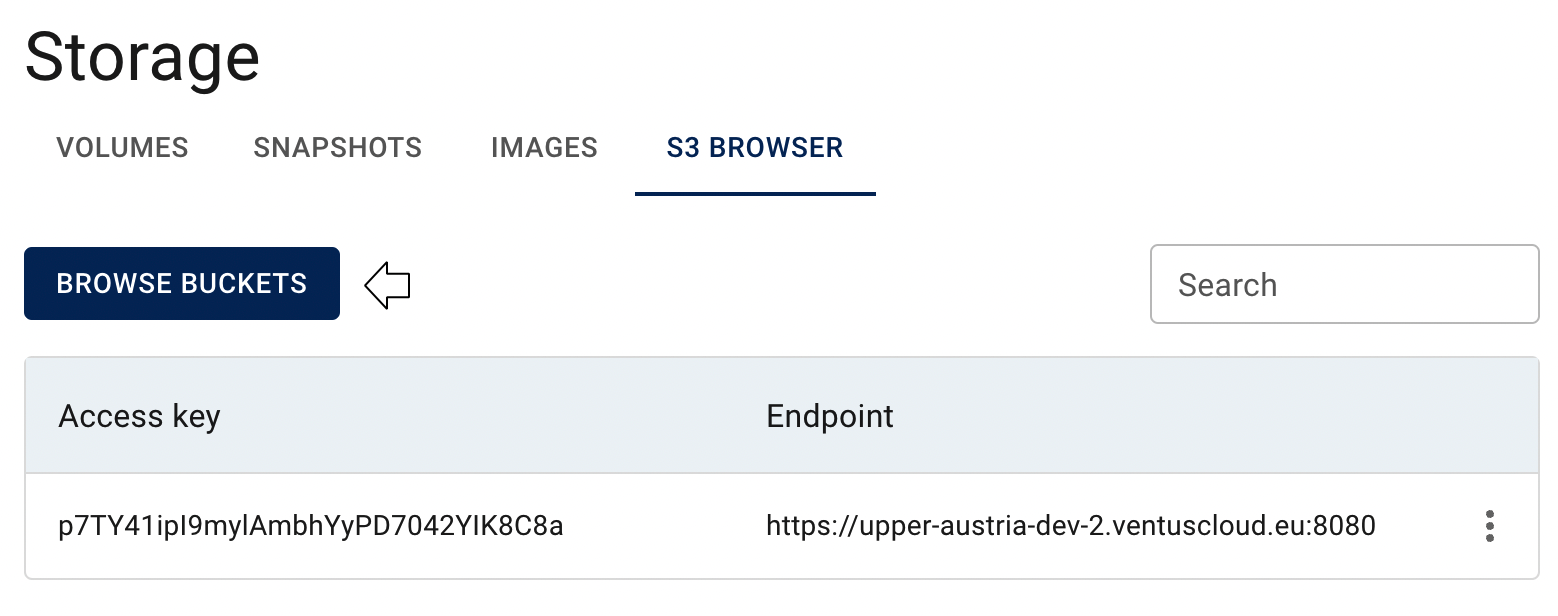
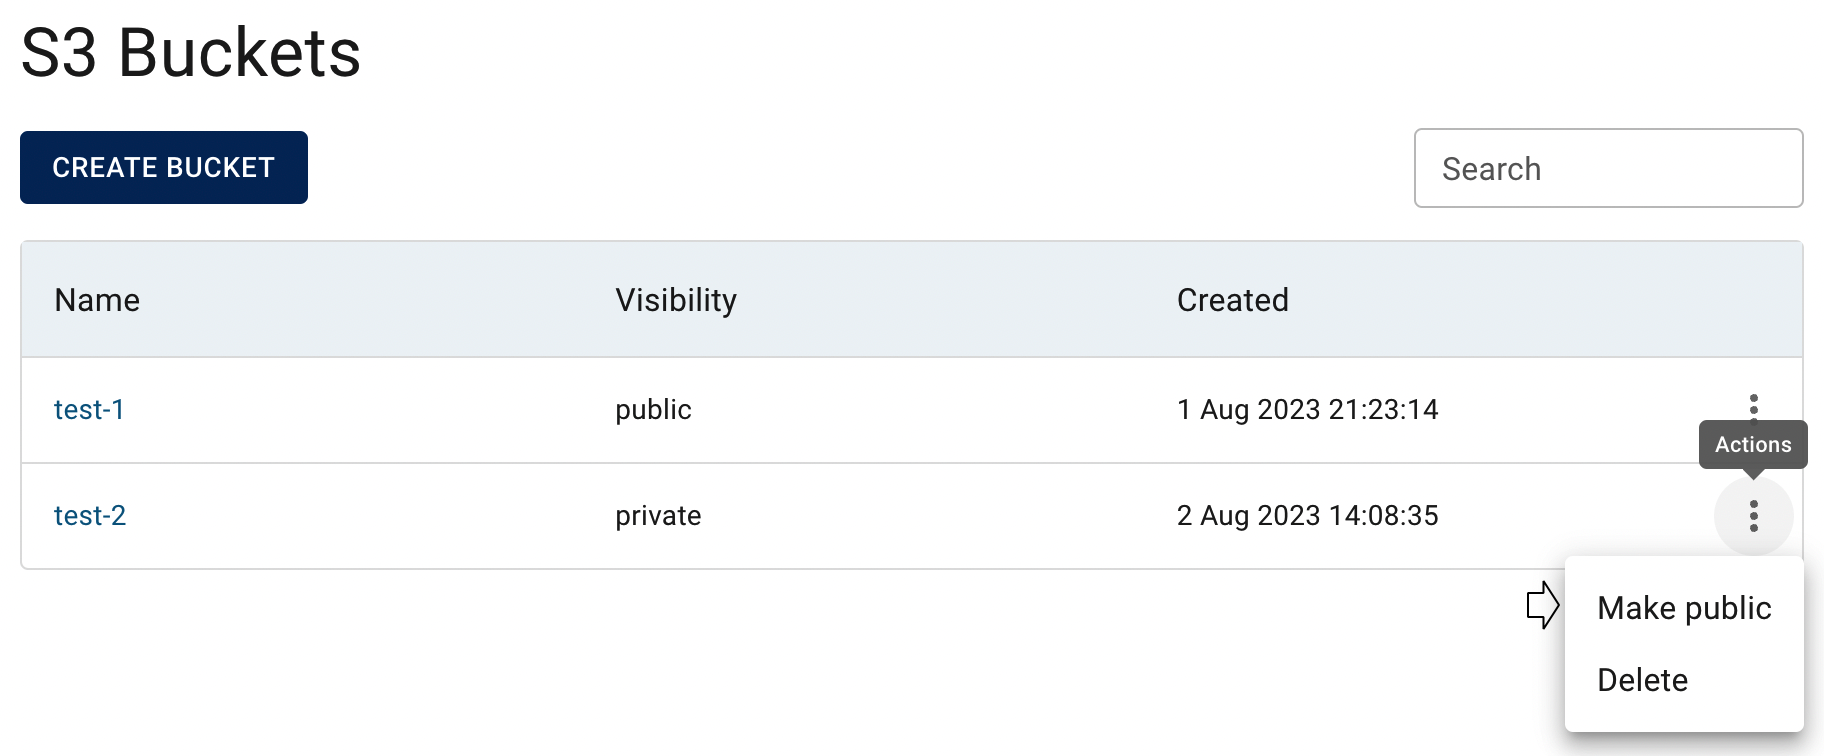
Clicking on this button will open the integrated S3-Browser and take you to the S3 Buckets page, where you can view all your previously created buckets, create new ones, browse objects inside the buckets, and perform other related actions: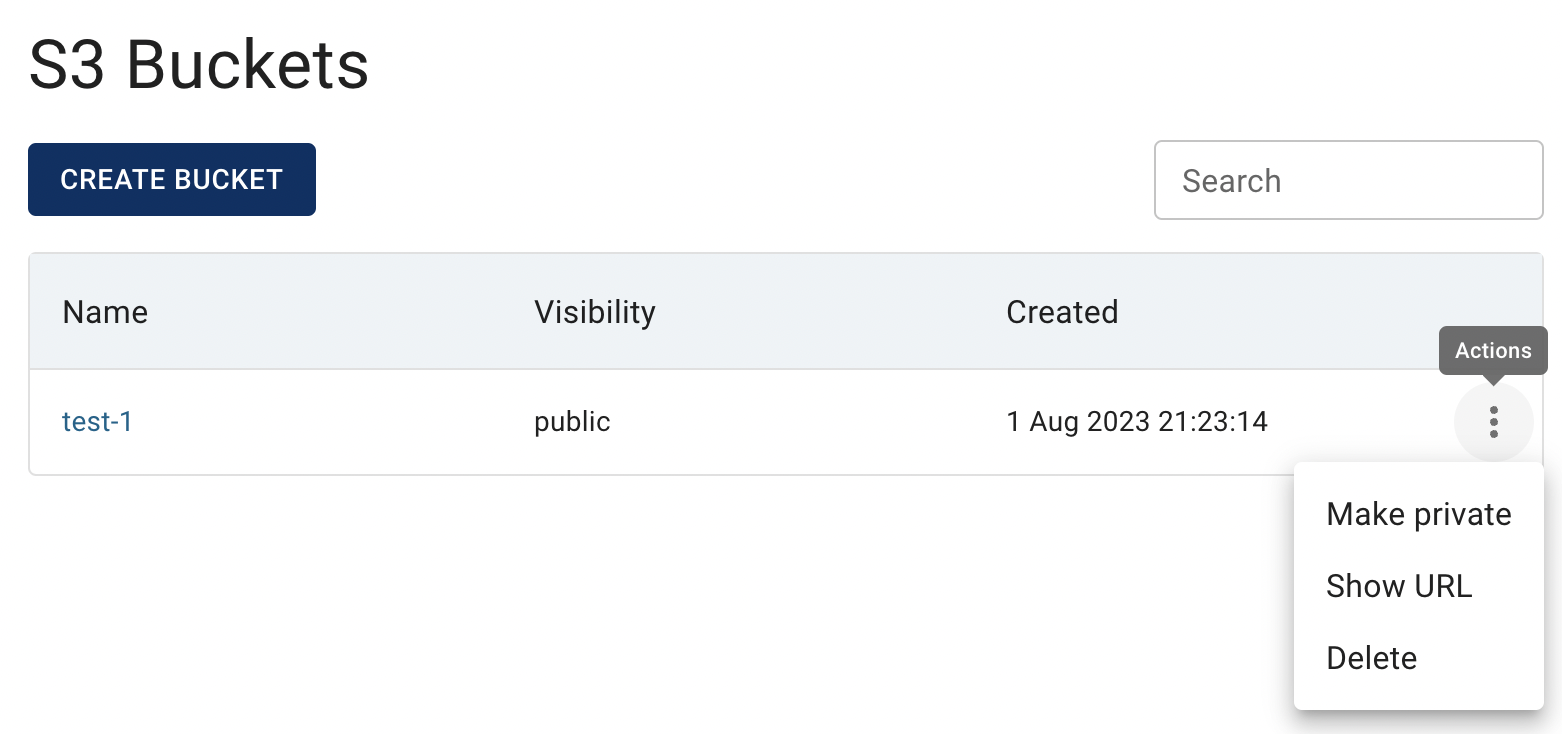
If you haven’t created Object Storage Credentials yet, click on the CREATE S3 CREDENTIALS button and once you have completed this step, you will be able to use the BROWSE BUCKETS button: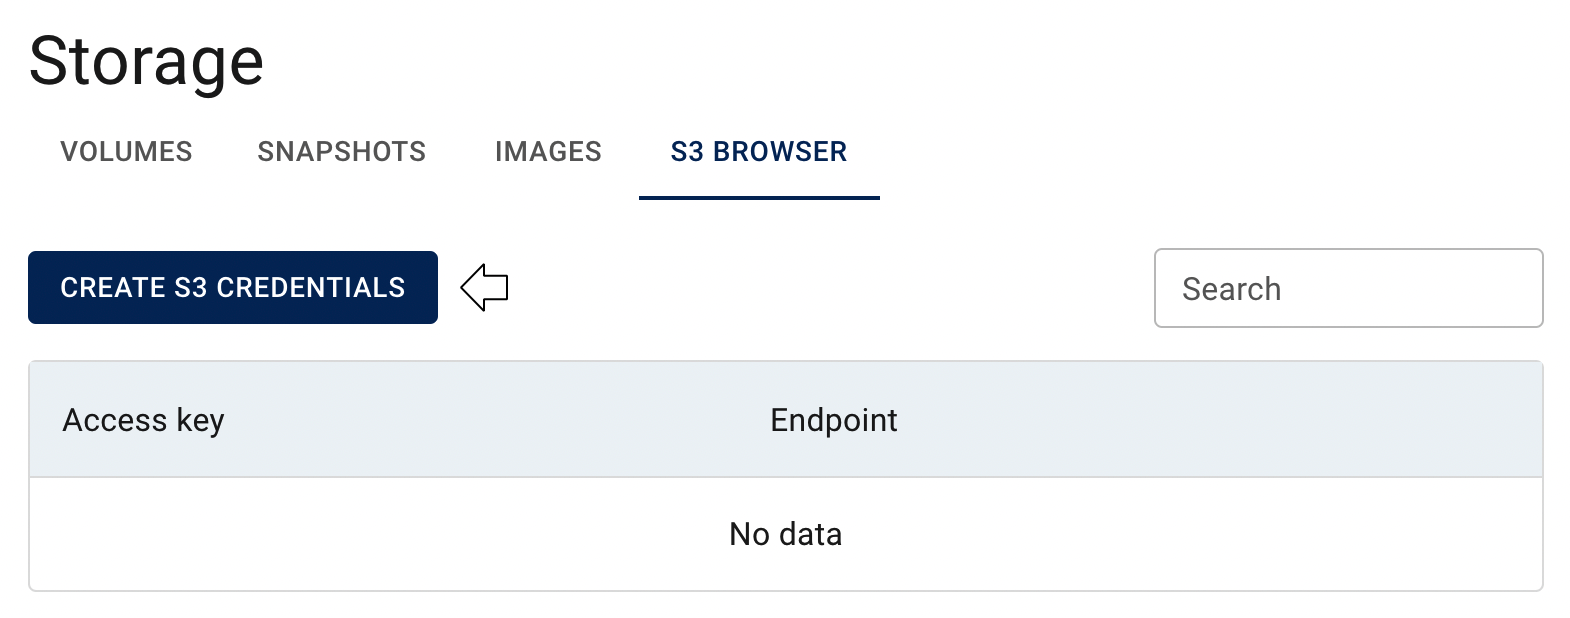
💡 To find more information about how to manage Object Storage Credentials, please, see the article - Object Storage Credentials.
Create bucket
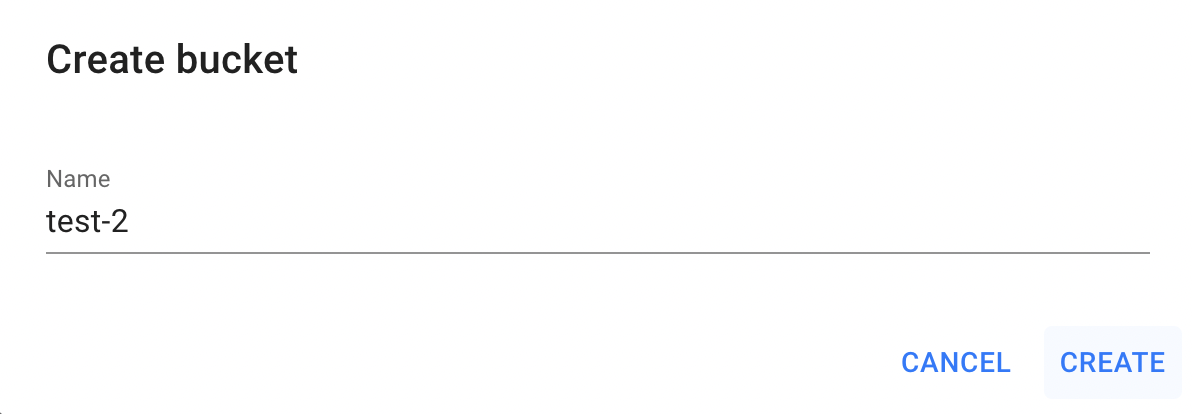
To create a new S3 Bucket in the Cloud Console, do the following:
- go to the S3 Buckets page and click on the CREATE BUCKET button in the upper left corner;
- specify the name of the Bucket and click on the CREATE button:
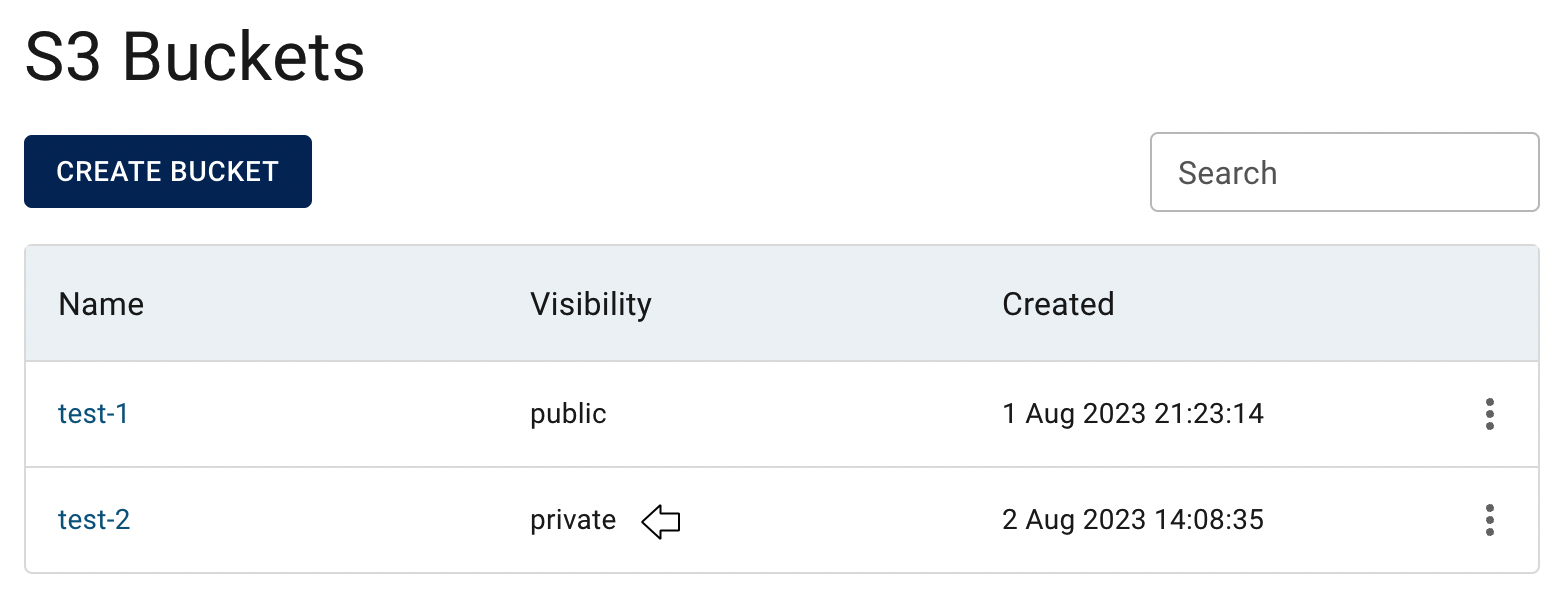
After these steps the newly created Bucket will be added to the S3 Buckets page with “private” access and “not configured” versioning status, which are the default settings:
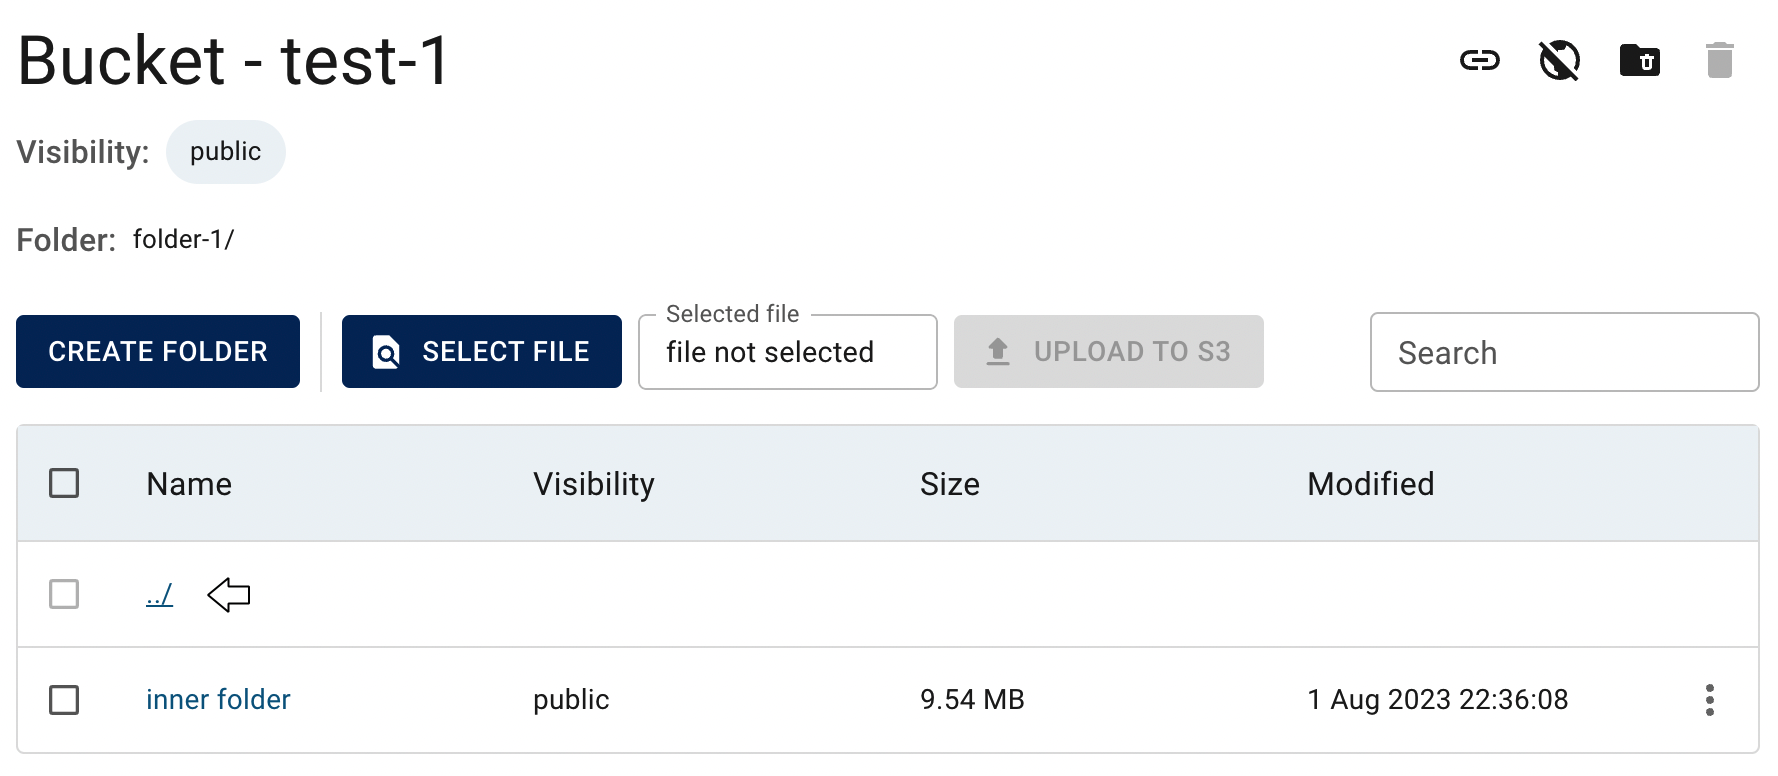
Browse folders and files within a bucket
To access and navigate through the folders and files inside a bucket, click on the Name of the corresponding bucket on the S3 Buckets page: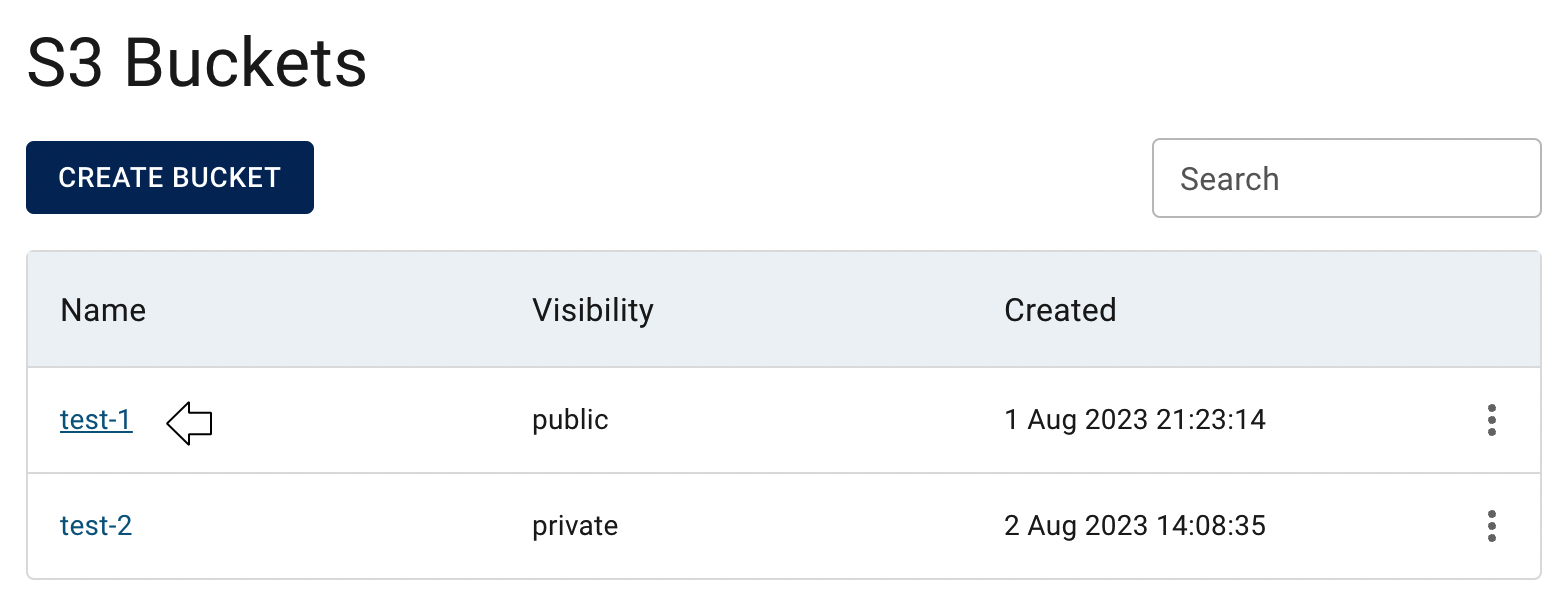
This action will redirect you to the inside Bucket page, where you can find:
- Bucket Details Area and Panel with Quick Actions - this section displays basic information about the bucket, such as its name, whether it is set as public or private, retention policy status, and provides various quick actions, including next options:
- get the bucket’s URL (if it is public);
- to change the bucket’s access settings (make it public or private);
- set retention policy for the bucket;
- enable/suspend versioning;
- delete the bucket;
- perform multi-deletion for selected files/folders (become enabled once you have selected at least one object (file or folder)).

- Create Folder Button, Upload Files Section and Search - this section allows you to create new folders within the bucket to organize your files, upload files from your local machine, and quickly search for content in the bucket:

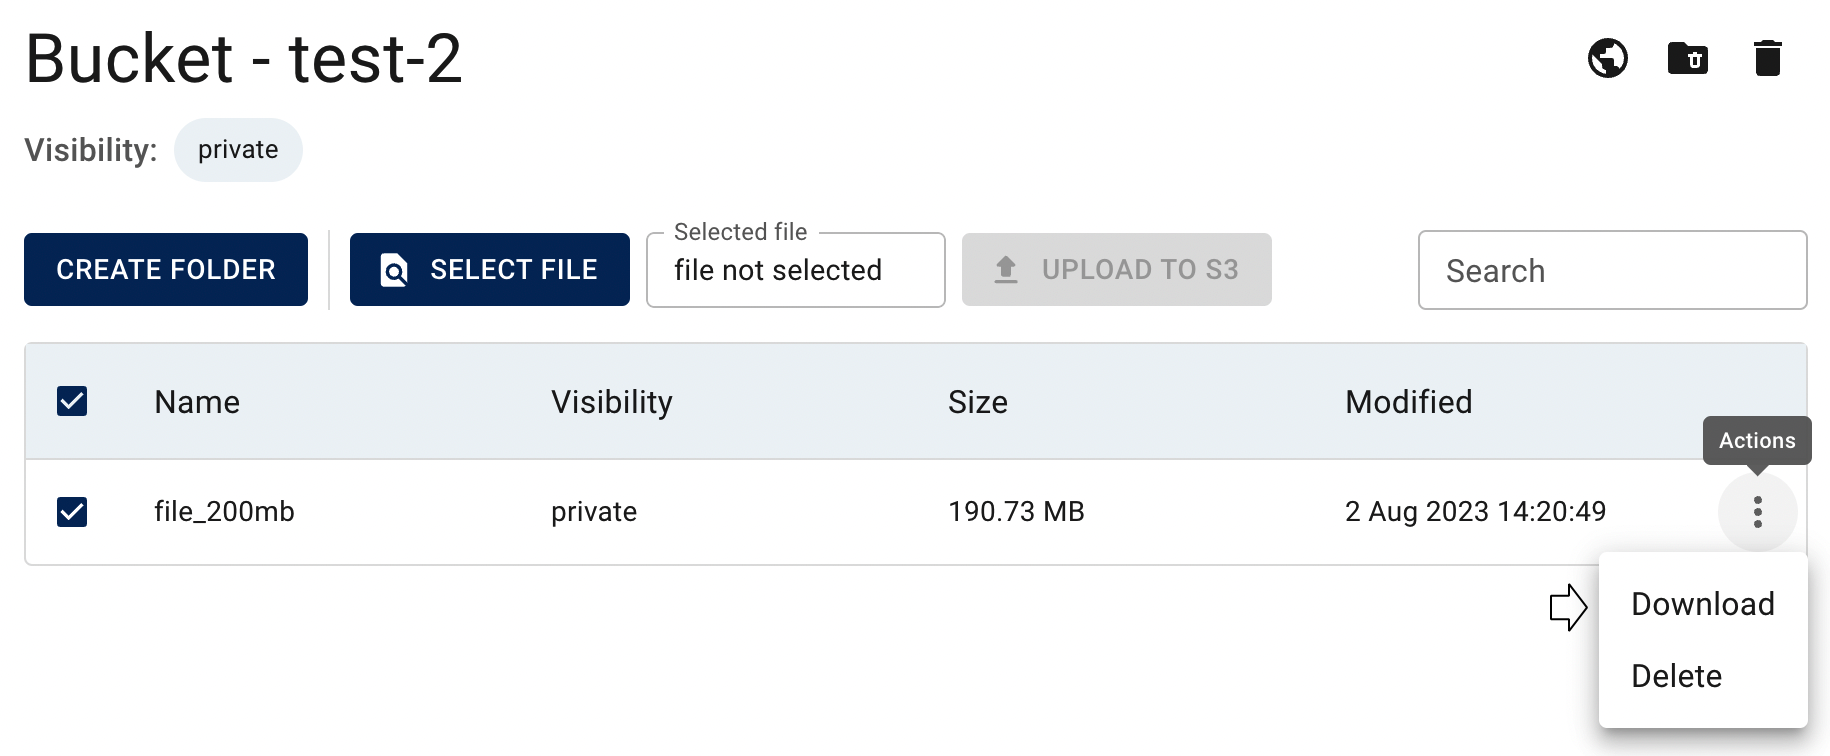
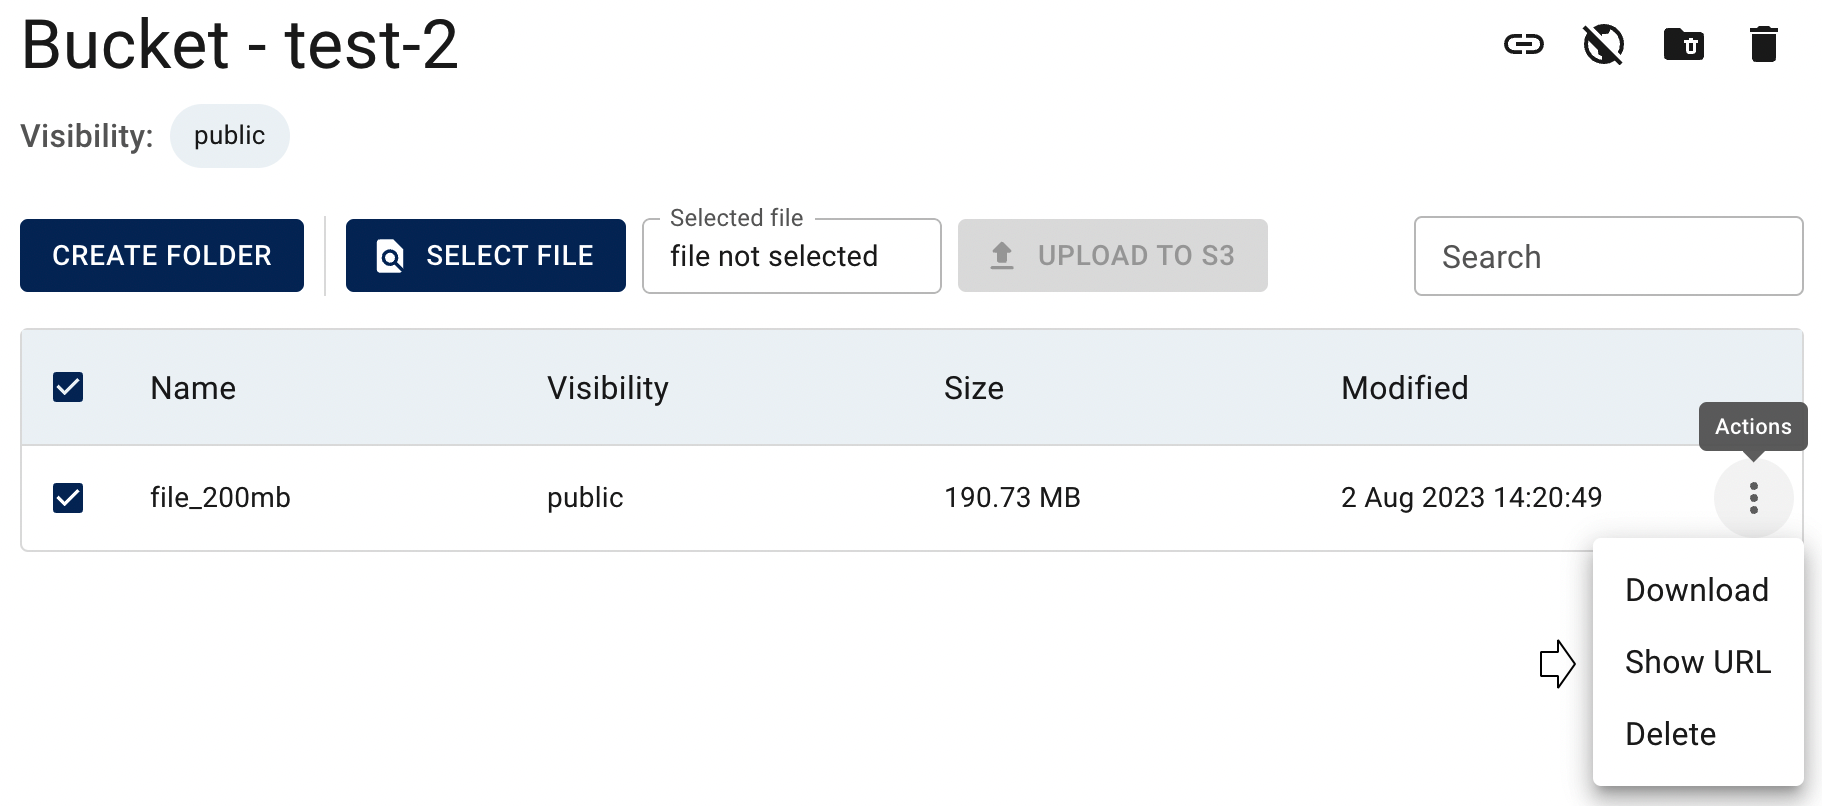
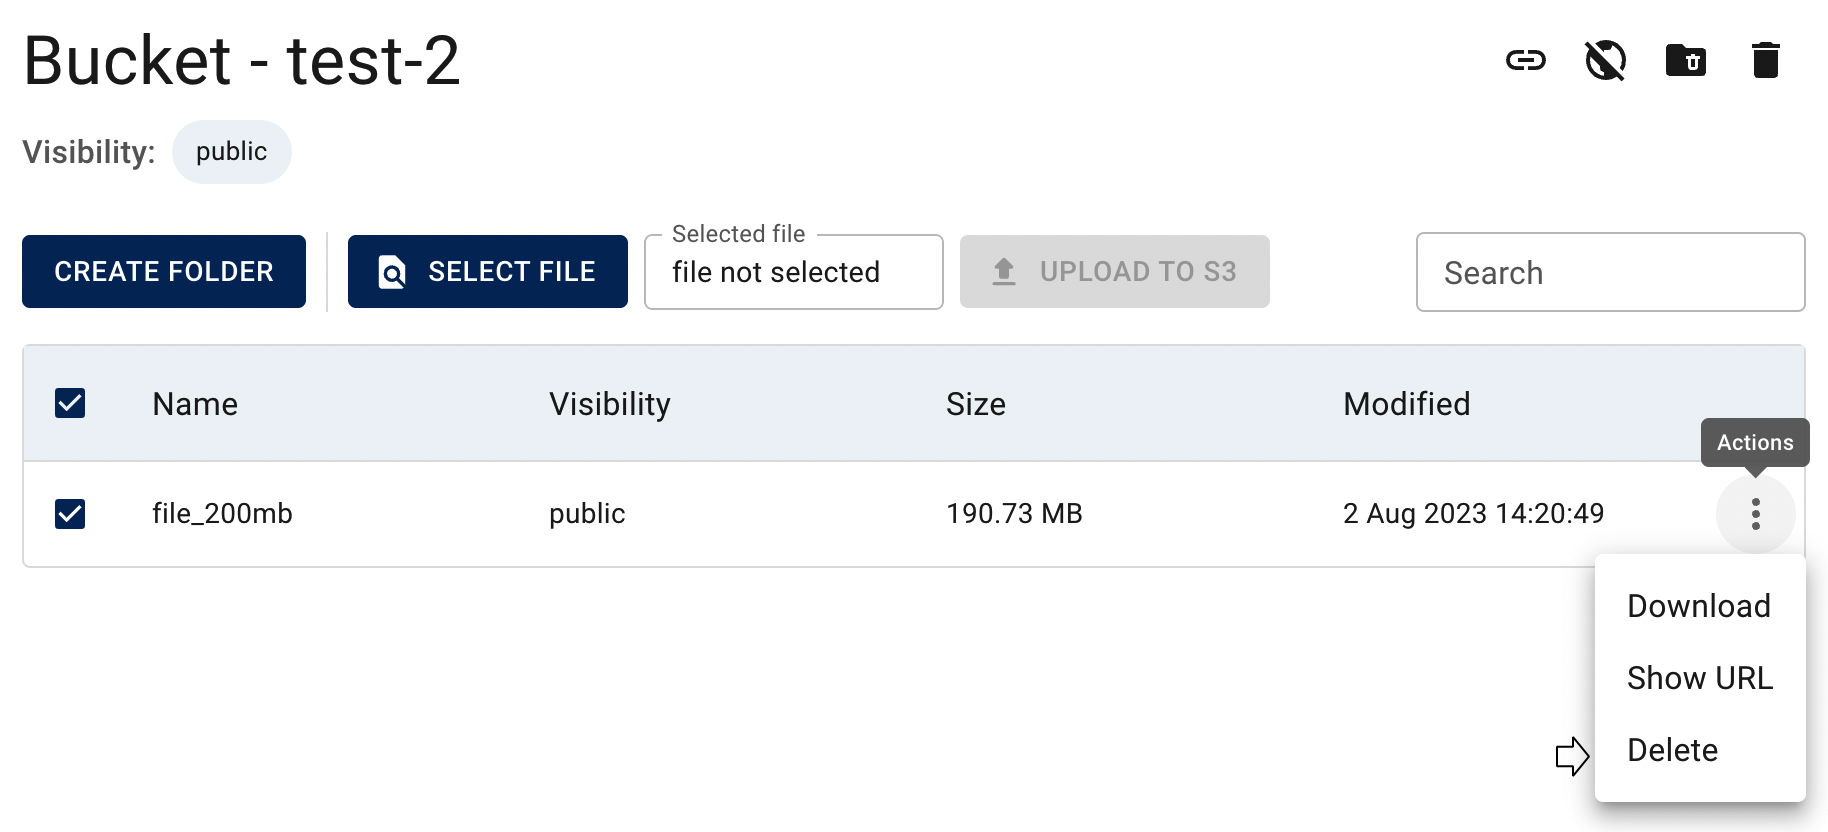
- Table of All Folders and Files, this section presents a comprehensive list of all folders and files stored within the bucket with their action icon, that opens a list of available management actions for the selected object:
- download file (currently you can download only separate files);
- show object url (available only if object has public visibility);
- delete object;
- delete object all versions (available only if bucket has enabled or suspend versioning);

To browse inside folders within the bucket, click on the Name of the desired folder: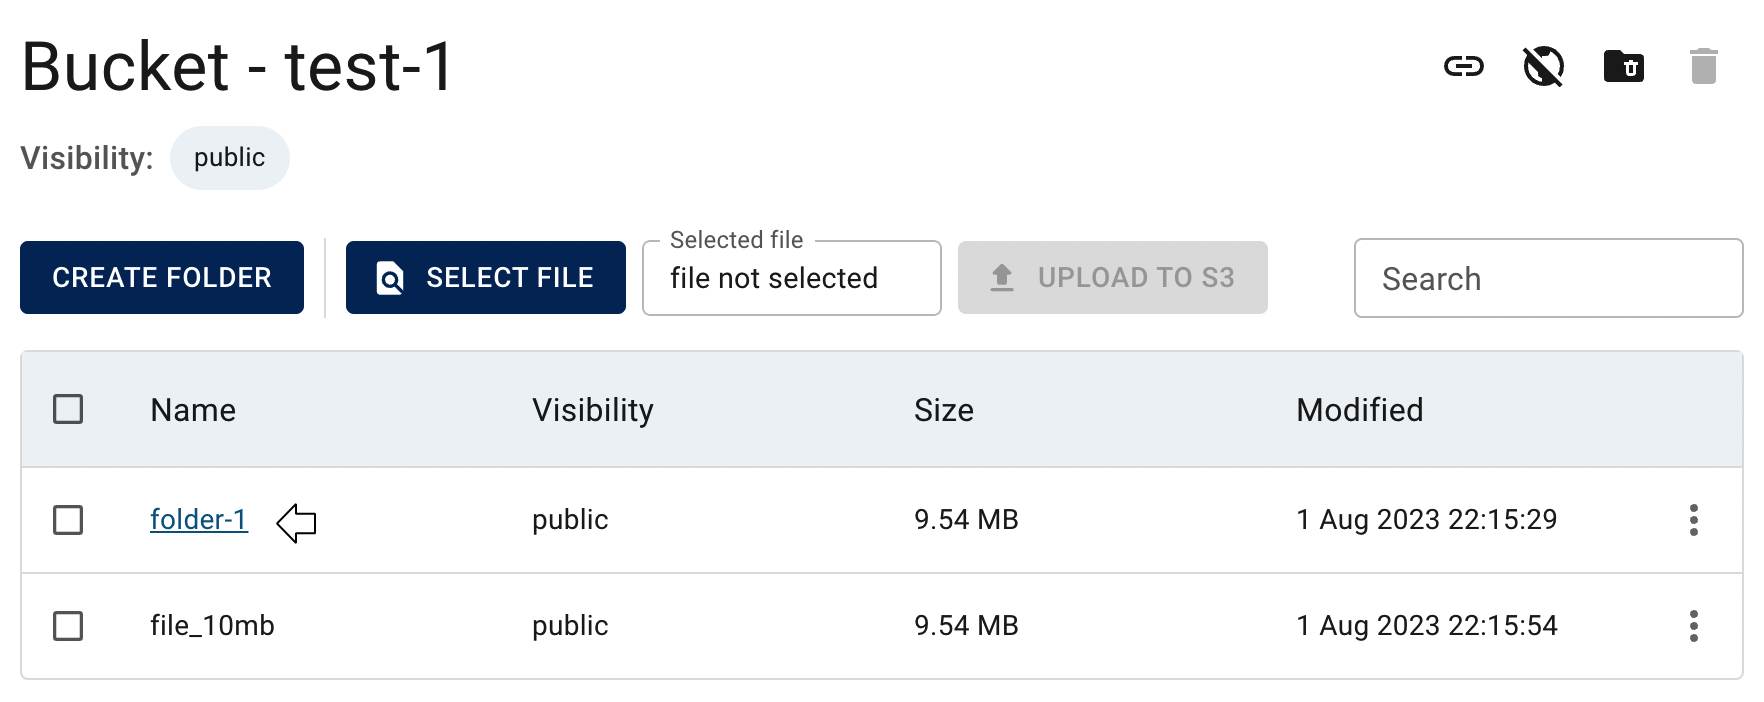
Inside the folder, you will have access to the same functionality as before, but on a deeper level. This allows you to continue navigating through the nested folder structure, perform actions like creating new folders or uploading files specific to the selected folder, and manage the files and folders within it.
To navigate to the parent level in the folder structure, click on the ../ icon and this action will take you up one level, allowing you to browse the contents of the previous folder in the hierarchy:
Create folder
To create a new Folder inside S3 Bucket in the Cloud Console, do the following:
- access the Bucket page in the Cloud Console by clicking on the name of the bucket from the Buckets page;
- click on the CREATE FOLDER button in the upper left corner;
- specify the Name of the Folder and click on the CREATE button.
After these steps the newly created Folder will be added to the Bucket. Inside the folder, you will have access to the same functionality as before, but on a deeper level. This allows you to continue navigating through the nested folder structure, perform actions like creating new folders or uploading files specific to the selected folder, and manage the files and folders within it.
Upload file
📌 As of the current limitations, the largest file you can upload via this integrated S3 browser is 5 GB.
- access the Bucket page in the Cloud Console by clicking on the name of the bucket from the Buckets page and click on the SELECT FILE button;
- on the appeared File selection dialog browse your local environment and choose the desired file you want to upload;
- after selecting the file you will be able to use UPLOAD FILE button. Click on it to initiate the upload process, and you will see a loader icon indicating the progress of the upload:

💡 If this is your first time attempting to upload a file to the selected bucket, the system may require you to set up CORS (Cross-Origin Resource Sharing) policies. In this case, a dialog window will appear asking you to grant permissions for console access to the specific bucket. Please click on GRANT PERMISSIONS to enable successful file uploading and proceed with the upload process.
Download file
📌 As of the current limitations, you can only download separate files one by one using the integrated S3 browser. There is no direct option to download entire folders or multiple files at once.
To download a File from S3 Bucket to your local environment, do the following:
- access the Bucket page in the Cloud Console by clicking on the name of the bucket from the Buckets page;
- identify the file, that you want to download, on the Bucket page;
- click on the Actions icon and select the Download in the list of available options:
- confirm your action on the next opened Confirmation window by clicking on the DOWNLOAD button.
After these steps, the downloading process of the selected file will start automatically.
Make bucket public
You can make your bucket public from both the Buckets page and the inside of the selected Bucket page.
- To make your bucket public from the Buckets page, follow these steps:
- go to the Buckets page in the Cloud Console;
- find the bucket you want to make public;
- click on the Actions icon and select the Make bucket public in the list of available options:
- confirm your action on the next opened Confirmation window by clicking on MAKE PUBLIC button.
- To make your bucket public from inside the selected Bucket page, follow these steps:
- access the Bucket page in the Cloud Console by clicking on the name of the bucket from the Buckets page.
- inside the bucket on the Panel with Quick Actions, click an option icon that allows you to change the bucket’s access permissions:

- confirm your action on the next opened Confirmation window by clicking on MAKE PUBLIC button.
After these steps your bucket will be publicly available and you can obtain a URL that allows direct access to the entire bucket or to individual objects (files or folders) within it. This URL can be shared with others, and they will be able to access the bucket or objects directly through the provided link without requiring any special authentication or permissions.
Making a bucket public allows anyone to access its contents without requiring authentication or special permissions. Please be cautious when setting buckets to public, as it may expose sensitive data to the public. Always review and manage access controls carefully to ensure the security of your data.
Get bucket’s public URL
You can obtain the URL for S3 bucket only if the bucket is publicly available. In such cases, you can generate a URL that allows direct access to the entire bucket or to individual objects (files or folders) through the provided link. However, if the bucket is not publicly accessible, generating a URL will not grant access, and users will require appropriate authentication and authorization to access the bucket.
You can get your bucket’s public URL from both the Buckets page and the inside of the selected Bucket page.
- To get your bucket’s public URL from the Buckets page, follow these steps:
- go to the Buckets page in the Cloud Console;
- find the bucket which public URL you want to get;
- click on the Actions icon and select the Show URL in the list of available options:

- the next opened window will provide your bucket’s URL and you can save it by clicking on the COPY TO CLIPBOARD button.
- To get your bucket’s public URL from inside the selected Bucket page, follow these steps:
- access the Bucket page in the Cloud Console by clicking on the name of the bucket from the Buckets page.
- inside the bucket on the Panel with Quick Actions, click an option icon that allows you to see bucket’s URL (this icon will be available only if your bucket is public):

The next opened window will provide your bucket’s URL and you can save it by clicking on the COPY TO CLIPBOARD button.
Get object’s public URL
You can obtain the URL for a folder or file in an S3 bucket only if the object is set as publicly available. In such cases, you can generate a URL that allows direct access to the object through the provided link. However, if the object is not publicly accessible, generating a URL will not grant access, and users will require appropriate authentication and authorization to access the object.
To get an object’s public URL, do the following:
- access the Bucket page in the Cloud Console by clicking on the name of the bucket from the Buckets page;
- identify the file or folder, which URL you want to get on the Bucket page;
- click on the Actions icon and select the Show URL in the list of available options:
The next opened window will provide your object’s URL and you can save it by clicking on the COPY TO CLIPBOARD button.
Make bucket private
You can make your bucket private from both the Buckets page and the inside of the selected Bucket page.
- To make your bucket private from the Buckets page, follow these steps:
- go to the Buckets page in the Cloud Console;
- find the bucket you want to make private;
- click on the Actions icon and select the Make bucket private in the list of available options:

- confirm your action on the next opened Confirmation window by clicking on MAKE PRIVATE button.
- To make your bucket private from inside the selected Bucket page, follow these steps:
- access the Bucket page in the Cloud Console by clicking on the name of the bucket from the Buckets page;
- inside the bucket on the Panel with Quick Actions, click an option icon that allows you to change the bucket’s access permissions:

- confirm your action on the next opened Confirmation window by clicking on MAKE PRIVATE button.
After these steps, your bucket will not be publicly available.
The access permissions will not allow the public to access the bucket or its contents through any direct URL. The objects within the bucket will remain private and can only be accessed by users with appropriate authentication and authorization.
Enable/suspend bucket versioning
💡 Bucket versioning allows you to keep multiple versions of the same object in your S3 bucket.
By default, when you create a new bucket via the integrated S3 browser, versioning is set to “not configured”, which means files exist in a single version only.
You can enable bucket versioning from both the Buckets page and the inside of the selected Bucket page.
- To enable bucket versioning from the Buckets page, follow these steps:
- go to the Buckets page in the Cloud Console;
- find the bucket for which you want to change versioning settings;
- click on the Actions icon and select Enable versioning in the list of available options:

- confirm your action on the next opened Confirmation window by clicking on ENABLE button.
- To enable bucket versioning from inside the selected Bucket page, follow these steps:
- access the Bucket page in the Cloud Console by clicking on the name of the bucket from the Buckets page;
- inside the bucket on the Panel with Quick Actions, click an option icon that allows you to change the bucket’s versioning settings:

- confirm your action on the next opened Confirmation window by clicking on ENABLE button.
After these steps, the bucket’s versioning status will be enabled.
📌 Versioning behavior: Once versioning has been enabled on a bucket, it cannot be returned to “not configured” status. You can only suspend versioning, which prevents new versions from being created but keeps all existing versions intact.
Once versioning has been enabled on a bucket, you can later suspend it in the same way — either from the Buckets page or the selected Bucket page using the Suspend versioning option:
- suspend versioning from the Buckets page:

- suspend versioning from the Bucket page:

Deleting objects with versioning: When versioning is enabled or suspended, a simple Delete action will not permanently remove all object versions.
To completely delete an object and all its versions, use the Delete all versions option from the Actions menu.
Delete and multi-delete objects
📌 Deleting objects in buckets with “not configured” versioning:
To delete an object from an S3 bucket with versioning set to “not configured”, do the following:
- access the Bucket page in the Cloud Console by clicking on the name of the bucket from the Buckets page;
- identify the file or folder, that you want to delete on the Bucket page;
- click on the Actions icon and select the Delete in the list of available options:
- confirm your action on the next opened Confirmation window by clicking on the DELETE button.
After these steps, the selected file or folder will be deleted.
📌 Deleting objects in buckets with versioning:
If bucket versioning is “enabled” or “suspended”, a simple Delete action will not permanently remove all object versions.
In this case, select Delete all versions from the Actions menu:
Deleting objects with versioning: When versioning is enabled or suspended, a simple Delete action will not permanently remove all object versions.
To completely delete an object and all its versions, use the Delete all versions option from the Actions menu.
📌 Multi-delete files and folders:. Also, the integrated S3 browser allows you to perform multiple deletions of files and folders using the following steps:
- select the checkboxes of the files or folders that you want to delete;
- click on the delete icon which will become enabled on the Panel with Quick Actions once you have selected at least one object (file or folder):
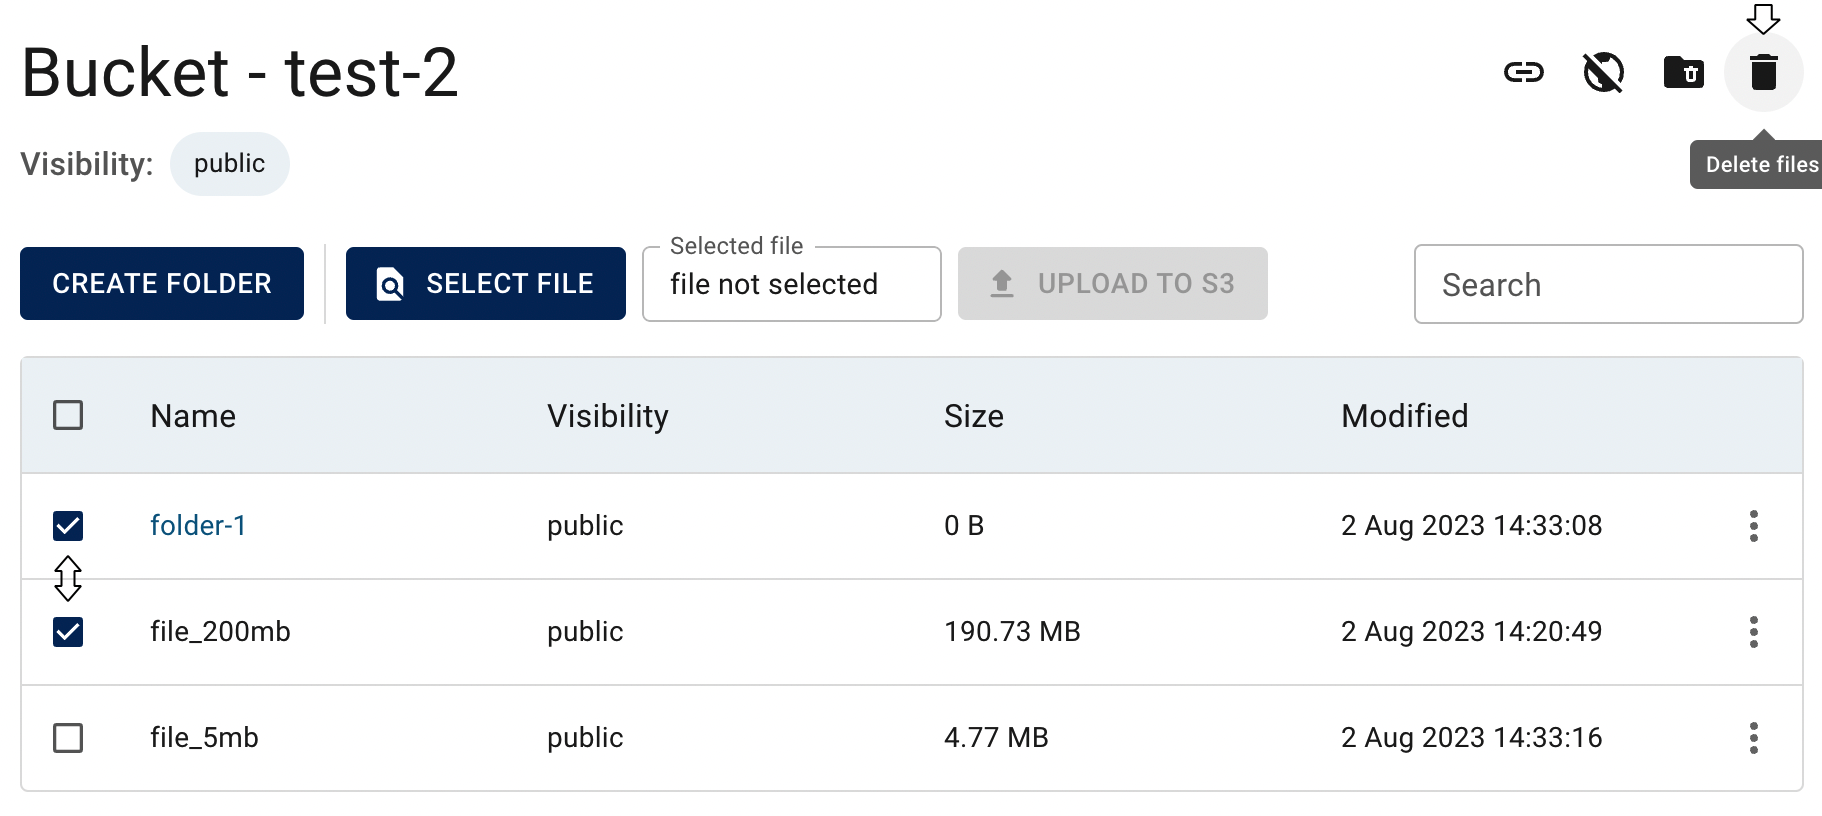
- if bucket versioning is “enabled” or “suspended”, mark the option to delete all versions (if needed) on the next opened Confirmation window and confirm your action by clicking on the DELETE button:

After these steps, the selected objects will be deleted in a few seconds.
Multi-delete objects with versioning: if versioning is enabled or suspended, mark the option to delete all versions.
Note: multi-delete applies to files only — selected folders will be ignored.
📌 Best practice for large datasets:
For buckets containing large datasets with numerous files, manually deleting objects one by one or even using multi-delete functionality can be time-consuming and inefficient. In such cases, the best practice is to use the retention policy feature, which provides automated cleanup functionality.
💡 To learn more about setting up and managing retention policies for your buckets, please see the section - Set bucket retention policy.
Set bucket retention policy
The integrated S3 browser allows you to set a retention policy for your bucket, which provides automatic cleanup functionality for managing large datasets. This feature enables you to specify the number of days after which files will be automatically and permanently removed from the bucket. The bucket itself will never be deleted by the retention policy and will remain intact and functional.
To set a retention policy for your bucket, do the following:
- access the Bucket page in the Cloud Console by clicking on the name of the bucket from the Buckets page;
- inside the bucket on the Panel with Quick Actions, click an option icon that allows you to set the bucket’s retention policy:

- on the next opened window specify the number of days for the retention period (files older than this number of days will be permanently removed) and click on the SET button:

After these steps, the retention policy will be active for your bucket. All files that are older than the specified number of days will be automatically and permanently deleted from the bucket. The bucket itself will never be affected by this policy and will remain available for new uploads and continued use.

📌 Once a retention policy is applied to a bucket, you cannot modify the existing policy settings. If you need to change the retention period, you must first delete the current policy and then set a new one with the desired settings.
Setting a retention policy will permanently delete files older than the specified number of days. This action cannot be undone. Please ensure you have proper backups of important data before applying a retention policy. This feature is particularly useful for managing large datasets that require regular cleanup. Remember that the bucket itself will never be deleted by the retention policy.
⚠️ Lifecycle Configuration Shadowing: If you’ve previously set up custom lifecycle rules on your bucket using the S3 API or other tools, please note that these may shadow the retention policy set through the Cloud Console. To avoid unexpected behavior, review and adjust any existing lifecycle rules before applying a new policy.
Fast bucket cleanup technique
To quickly delete all files from a bucket with large amounts of data:
- Set a retention policy to 1 day
- Wait for automatic cleanup to complete
- Remove the retention policy before uploading new files
This method will clear all bucket content while keeping the bucket itself intact.
⚠️ CRITICAL: You must delete or change the 1-day retention policy before uploading any new files, otherwise new uploads will also be automatically deleted after one day.
💡 This technique is the fastest way to empty buckets containing thousands of files, much more efficient than manual deletion methods.
Delete retention policy
To delete an existing retention policy from your bucket, do the following:
- access the Bucket page in the Cloud Console by clicking on the name of the bucket from the Buckets page;
- inside the bucket on the Panel with Quick Actions, click an option icon that allows you to delete the bucket’s retention policy:

- confirm your action on the next opened Confirmation window by clicking on the DELETE button.
After these steps, the retention policy will be removed from your bucket, and no automatic file deletion will occur. You can then set a new retention policy if needed.
Delete bucket
To avoid any potential data loss during the deletion process, in the Cloud Console, you can only delete a bucket if it is empty.
Before deleting a bucket, all files must be removed. To empty your bucket efficiently, you can either use the Fast bucket cleanup technique with retention policy for large datasets, or the multi-delete functionality for smaller amounts of data.
You can delete bucket from both the Buckets page and the inside of the selected Bucket page but before, please ensure that all the objects (files and folders) inside the bucket have been removed or moved to another location.
- To delete bucket from the Buckets page, follow these steps:
- go to the Buckets page in the Cloud Console;
- find the bucket you want to delete;
- click on the Actions icon and select the Delete in the list of available options:

- confirm your action on the next opened Confirmation window by clicking on DELETE button.
- To delete bucket from inside the Bucket page, follow these steps:
- access the Bucket page in the Cloud Console by clicking on the name of the bucket from the Buckets page;
- inside the bucket on the Panel with Quick Actions, click an option icon that allows you to delete bucket:

- confirm your action on the next opened Confirmation window by clicking on DELETE button.
After these steps, your bucket will be deleted.