Virtual Machines
On this page, you can find an explanation of how to create, resize, delete Linux and Windows Virtual Machine, and instructions for other steps to manage Virtual Machines in Cloud Console.
Table of contents
- Table of contents
- Virtual Machines page
- Create Linux Virtual Machine
- Create Windows Virtual Machine
- Create a Windows VM with a predefined password via CLI
- Create a Virtual Machine with Cloud-init
- Virtual Machine details page
- Download RDP File
- Activate/Deactivate Interface
- Associate/Disassociate Floating IP
- Edit Virtual Machine
- Resize Virtual Machine
- Shutoff Virtual Machine
- Shelve Virtual Machine
- Start Virtual Machine
- Delete Virtual Machine
- Backup Virtual Machine
- Restore Virtual Machine
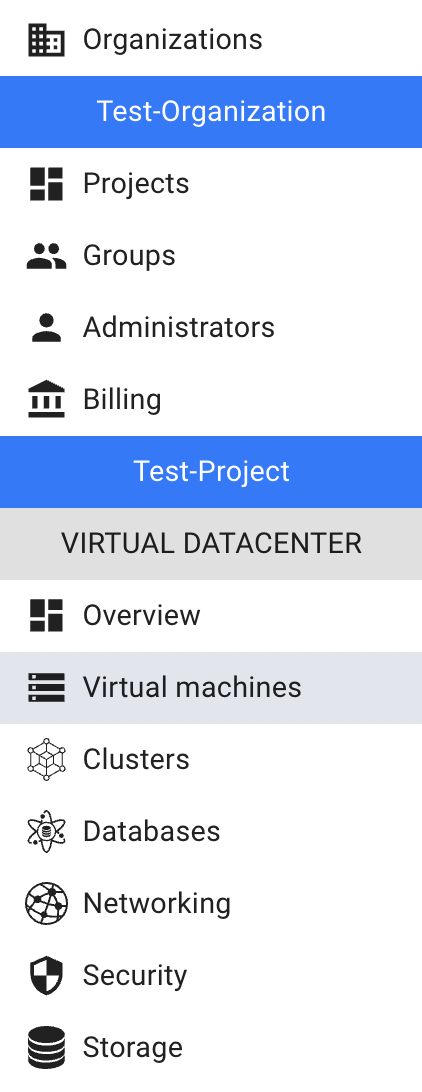
Virtual Machines page
In the Cloud Console you can create Windows and Linux Virtual Machines from official and custom images, snapshots or volumes.
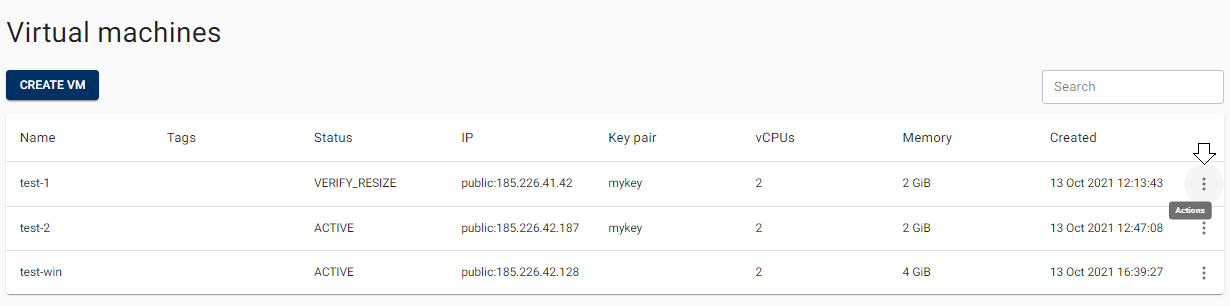
On this page you can find all created Virtual Machines in the current Project of the selected Organization, with the Create button, Search bar and Actions icon, which opens a list of available management actions for the selected VM:
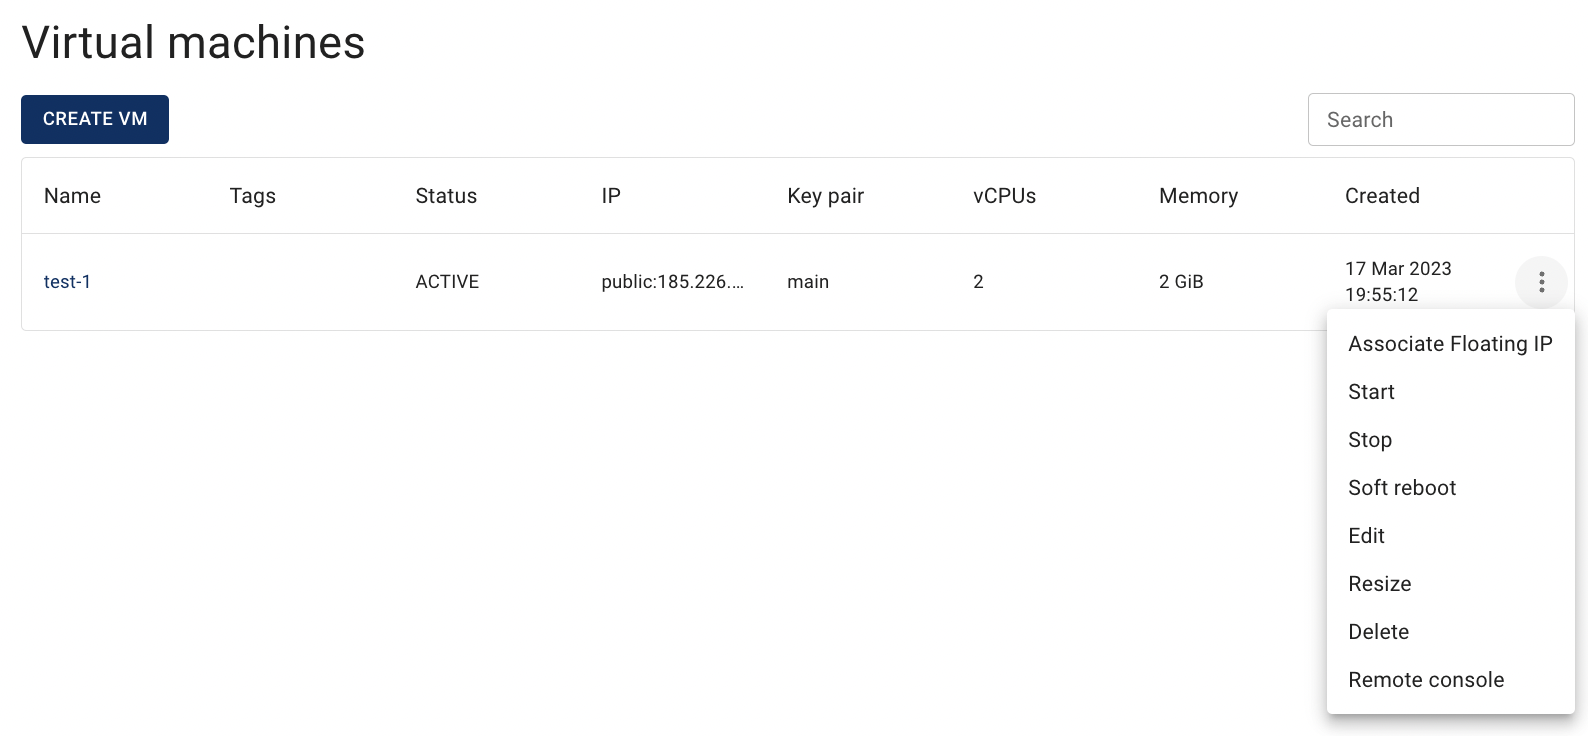
Actions icon opens the next list of available management actions:
- Associate Floating IP - assigns a public IP address to the VM, making it accessible from the internet (useful if the VM is in a private network).
- Start - boots the VM if it is currently shut off or shelved.
- Resize - changes the VM’s flavor.
- Edit - allows to rename the VM anr set tags fot it.
- Soft reboot - gracefully restarts the VM, similar to a standard operating system reboot.
- Shutoff - stops the VM while keeping its resources (CPU, RAM) reserved on the hypervisor.
- Shelve - deallocates the VM and releases its resources (CPU, RAM) from the hypervisor.
- Delete - permanently removes the VM.
- Remote console - opens a web-based remote console to access the VM directly.
- Download RDP file - available only for Windows VMs; downloads a Remote Desktop Protocol file to enable remote connection.
Create Linux Virtual Machine
To create new Linux VM, do the following:
- go to the Virtual Machines page and click on the CREATE VM icon in the upper left corner;
- fill in the form on the next opened Create Virtual Machine window and click on the CREATE icon:
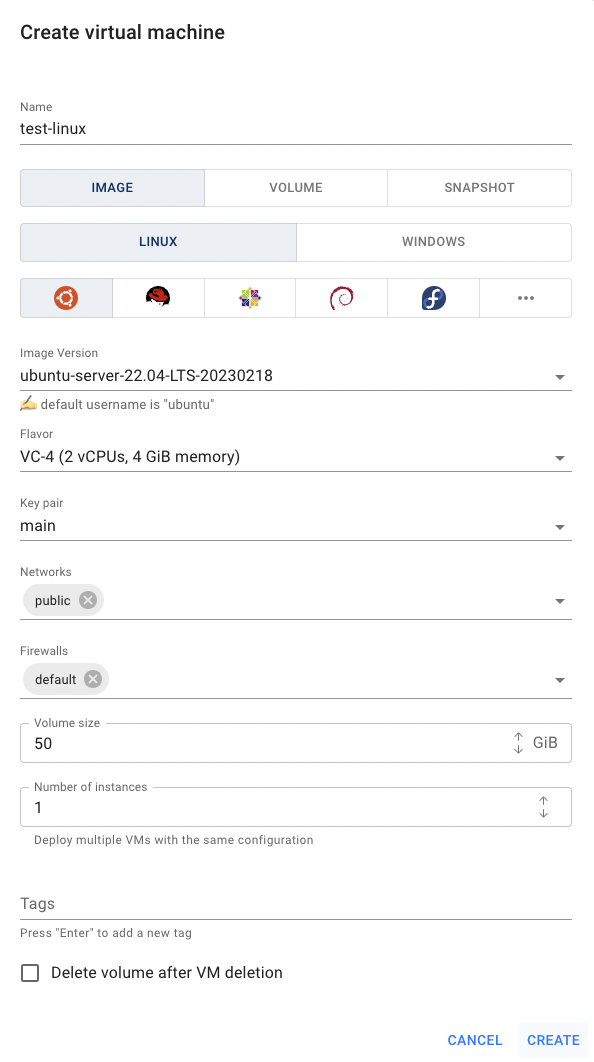
Name - specify a name for the virtual machine.
Source - choose the source for creating the VM: image, volume, or snapshot;
by default, “image” is pre-selected.OS Platform - choose the operating system platform: Linux or Windows;
in this example we will create the Linux VM.Linux Distribution - if Linux OS is selected, choose the desired distribution (e.g. Ubuntu, CentOS, etc.).
Image Version/Volume name/Snapshot name - based on the selected source, specify the corresponding image version, volume name, or snapshot name.
Flavor - select the size of the VM (number of vCPUs and RAM);
by default, “VC-4 (2 vCPUs, 4 GiB memory)” is pre-selected.Key pair - required for Linux VMs; choose an existing SSH key (created on the SSH Keys page) or create a new one to connect to the VM via SSH.
Networks / Ports — choose how the VM will connect to the network:
- Networks — select one or more available networks. A new port will be created automatically for each selected network;
by default, “public” network is pre-selected;
optionally specify Fixed IPs within the subnet when using the network option. - Ports — select an existing port to attach to the VM; the assigned firewalls will be displayed below (read-only).
- Networks — select one or more available networks. A new port will be created automatically for each selected network;
Firewalls - define which network rules control VM traffic:
- using Networks, you can select Firewalls manually;
by default, “default” Firewall is pre-selected; - using Ports, Firewalls will be inherited from the selected port.
💡 The default Firewall allows outgoing Internet access but restricts incoming connections, except from resources in the same Firewall group.
- using Networks, you can select Firewalls manually;
Volume size (GB) - provide the preferred disk size for the VM;
valid range: 10–1000 GiB;
minimal available size for Linux VMs - 10 GB; for Windows VMs - 50 GB;
by default, “50 GB” is pre-selected.Delete Volume after VM deletion – enable this option to automatically delete the volume when the VM is removed.
Advanced settings - optional; check this box to expand additional fields:
- Cloud-init data - a script or YAML config executed on the VM’s first boot (see Create a Virtual Machine with Cloud-init);
- Tags - assign one or more tags to the VM.
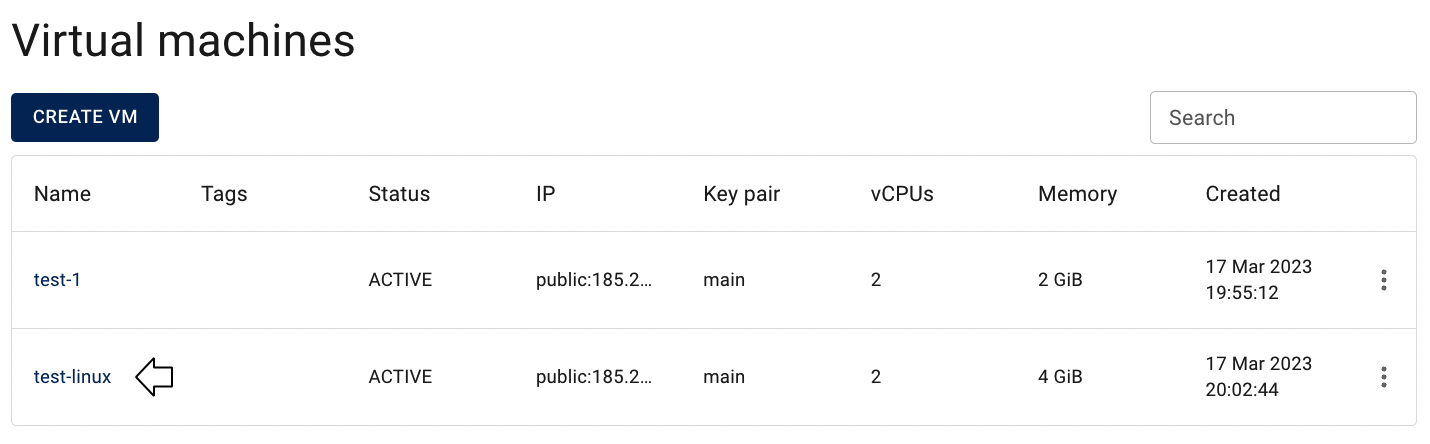
After these steps, the newly created Linux VM will be added to the Virtual Machine page with the status ACTIVE:
💡 To connect to the selected Linux Virtual Machine remotely via SSH, you need to add an additional Firewall with a rule, that will allow incoming traffic to TCP port 22 (like shown below) - to find additional instructions and information about this, please see the article Access Linux VM.

Create Windows Virtual Machine
To create new Windows VM, do the following:
- go to the Virtual Machines page and click on the CREATE VM icon in the upper left corner;
- fill in the form on the next opened Create Virtual Machine window and click on the CREATE icon:
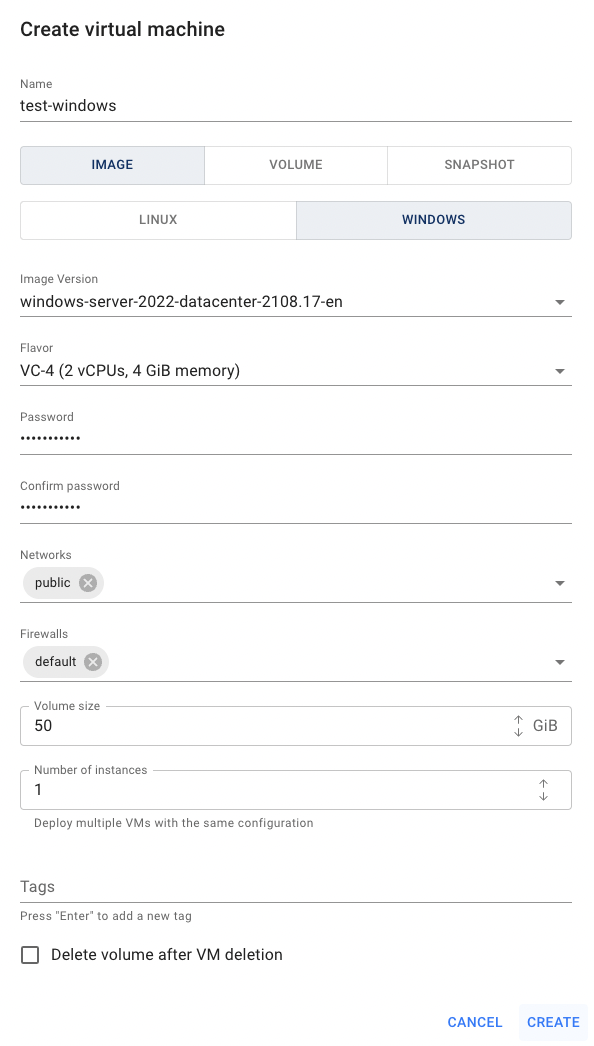
Name - specify a name for the virtual machine.
Source - choose the source for creating the VM: image, volume, or snapshot;
by default, “image” is pre-selected.OS Platform - choose the operating system platform: Linux or Windows;
in this example we will create the Linux VM.Linux Distribution - if Linux OS is selected, choose the desired distribution (e.g. Ubuntu, CentOS, etc.).
Image Version/Volume name/Snapshot name - based on the selected source, specify the corresponding image version, volume name, or snapshot name.
Flavor - select the size of the VM (number of vCPUs and RAM);
by default, “VC-4 (2 vCPUs, 4 GiB memory)” is pre-selected.Password - required for Windows VMs; come up with the root password (it must contain at least one Latin letter in upper case, one Latin letter in lower case, digit, special character, and must be at least 8 characters long);
Confirm password;
Networks / Ports — choose how the VM will connect to the network:
- Networks — select one or more available networks. A new port will be created automatically for each selected network;
by default, “public” network is pre-selected;
optionally specify Fixed IPs within the subnet when using the network option. - Ports — select an existing port to attach to the VM; the assigned firewalls will be displayed below (read-only).
- Networks — select one or more available networks. A new port will be created automatically for each selected network;
Firewalls - define which network rules control VM traffic:
- using Networks, you can select Firewalls manually;
by default, “default” Firewall is pre-selected; - using Ports, Firewalls will be inherited from the selected port.
💡 The default Firewall allows outgoing Internet access but restricts incoming connections, except from resources in the same Firewall group.
- using Networks, you can select Firewalls manually;
Volume size (GB) - provide the preferred disk size for the VM;
valid range: 10–1000 GiB;
minimal available size for Linux VMs - 10 GB; for Windows VMs - 50 GB;
by default, “50 GB” is pre-selected.Delete Volume after VM deletion – enable this option to automatically delete the volume when the VM is removed;
Advanced settings - optional; check this box to expand additional fields:
- Cloud-init data - a script or YAML config executed on the VM’s first boot (see Create a Virtual Machine with Cloud-init);
- Tags - assign one or more tags to the VM.
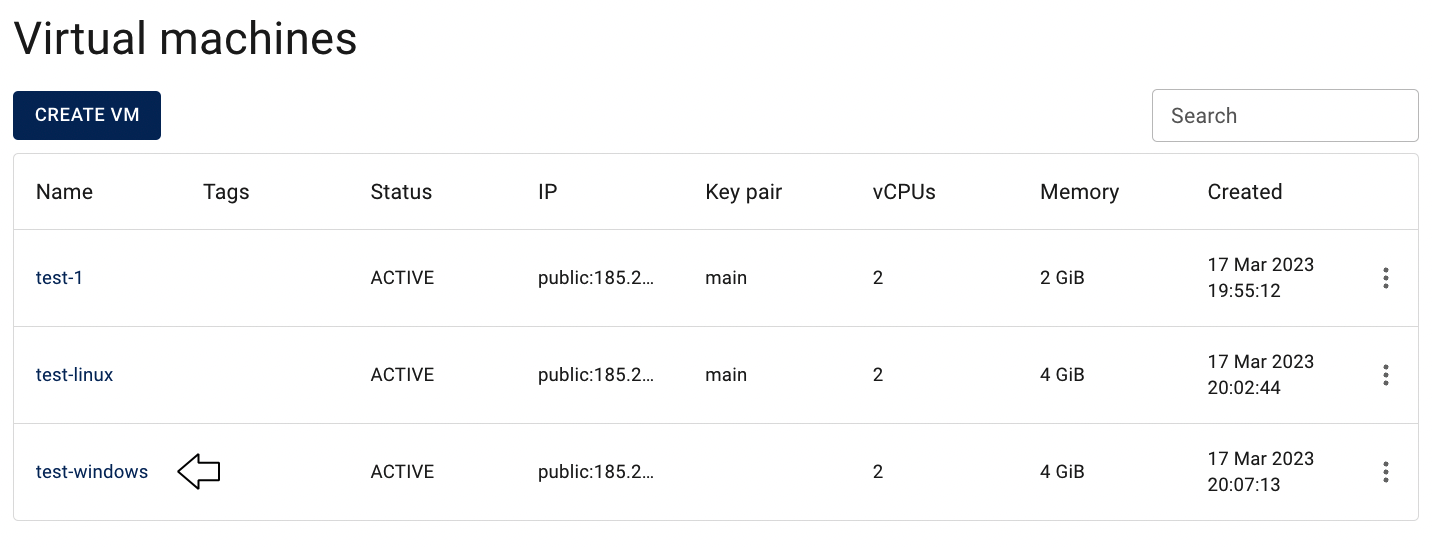
After these steps, the newly created Windows VM will be added to the Virtual Machine page with the status ACTIVE:
💡 To connect to the selected Windows Virtual Machine remotely via RDP you need to add an additional Firewall with a rule that will allow incoming traffic to TCP port 54000 like shown below - to find additional instructions and information about this, please see the article Access Windows VM;

Create a Windows VM with a predefined password via CLI
When creating a Windows Virtual Machine via the CLI, you can set the administrator password directly in the creation command by using the --property admin_pass flag.
To create a Windows VM with a predefined password, run the following command:
openstack server create \
  --flavor VC-2 \
  --image windows-server-2022-datacenter-2108.28-en \
  --network public \
  --property admin_pass="XXXXX" \
  --wait \
  my-windows-vm
Where:
- –flavor - specifies the flavor (resource configuration) for the VM;
- –image - specifies the Windows image to use;
- –network - specifies the network to attach the VM to;
- –property admin_pass - sets the administrator password for the Windows VM;
- –wait - waits until the VM reaches the ACTIVE status before returning;
- my-windows-vm - the name of the Virtual Machine to be created.
After the command completes, the VM will be available with the password you specified and can be used to connect via RDP as described in the article Access Windows VM;
Create a Virtual Machine with Cloud-init
💡 Cloud-init data allows you to automatically configure a virtual machine on its first boot — for example, create users, set passwords, install packages, or run custom scripts.
📌 Cloud-init data - a script or YAML config that will be passed to the instance on first boot; Supports standard #cloud-config YAML format for Linux and PowerShell scripts for Windows VMs.
To create a VM with a Cloud-init configuration, do the following:
- go to the Virtual Machines page and click on the CREATE VM icon in the upper left corner;
- fill in the standard VM creation form (see Create Linux Virtual Machine or Create Windows Virtual Machine for details);
- check the Advanced settings checkbox at the bottom of the form to expand additional options:
- paste your Cloud-init script or YAML configuration in the Cloud-init data field and click on the CREATE icon:

After these steps, the VM will be created and the Cloud-init script will be executed automatically during the first boot.
Cloud-init data is executed only once, during the first boot of the VM. Make sure your script or configuration is correct before creating the VM, as it cannot be changed after creation.
Linux example (cloud-config YAML):
Use #cloud-config YAML format to create users, configure SSH access, or run commands on first boot:
#cloud-config
package_update: true
package_upgrade: false

packages:
  - nginx

runcmd:
  - systemctl enable nginx
  - systemctl start nginx
This example installs and starts the Nginx web server during VM initialization:

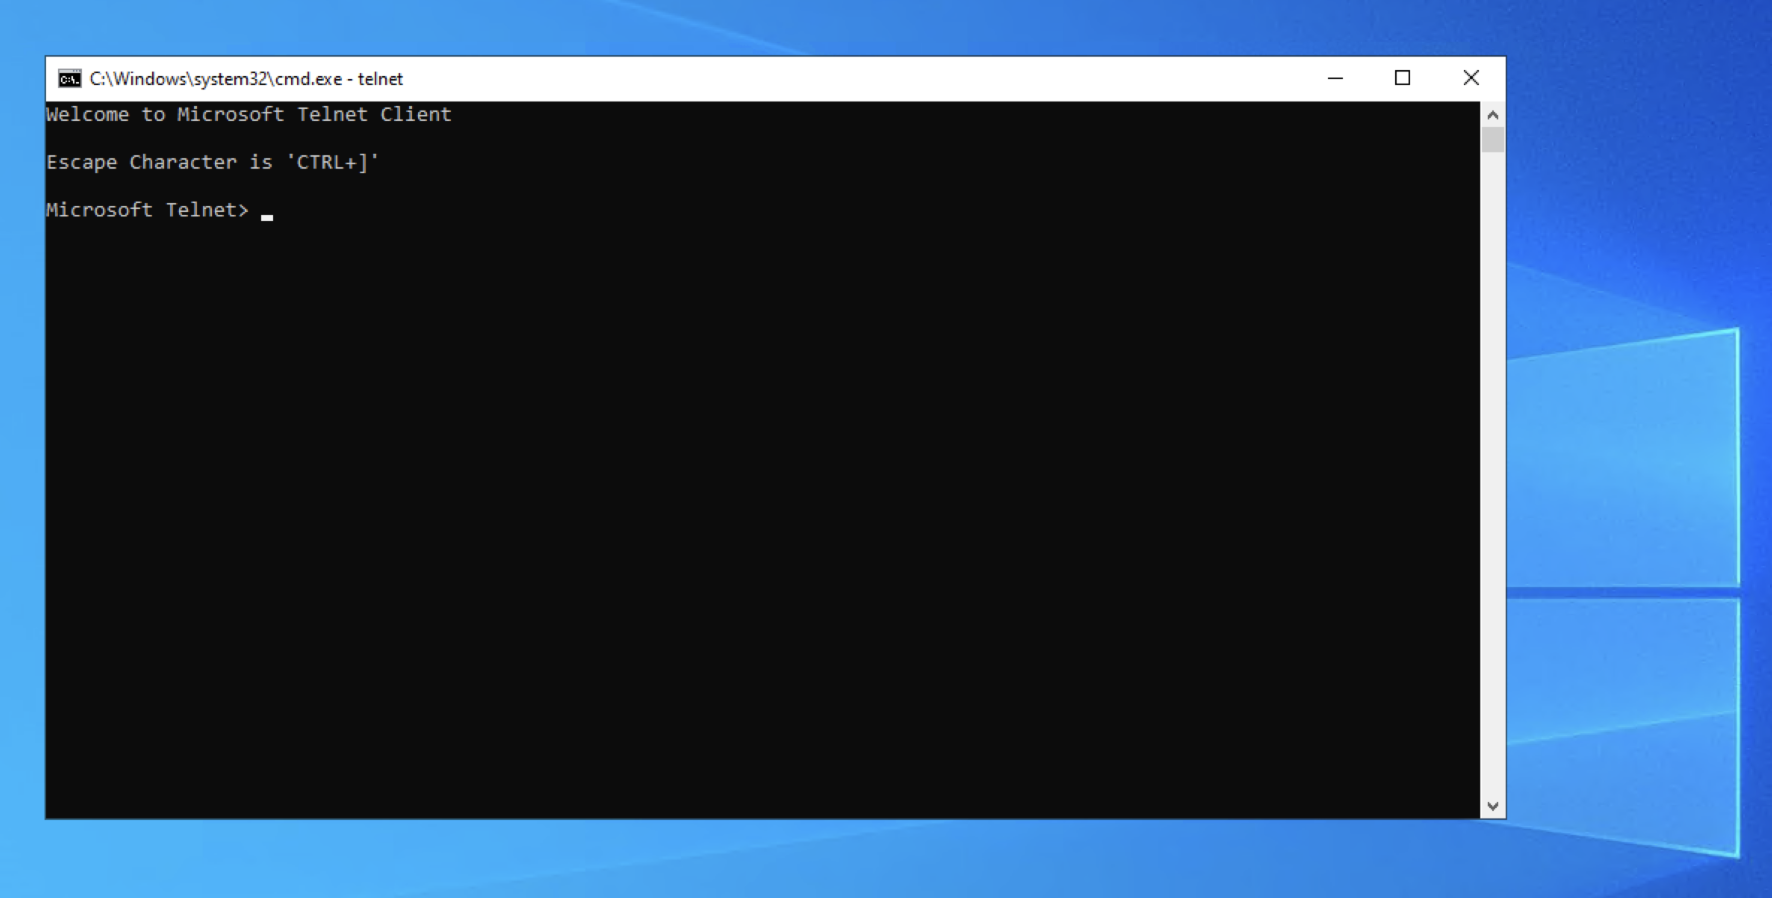
Windows example (PowerShell):
Use a PowerShell script to configure Windows VMs on first boot — for example, to create a local user and add them to the Administrators group:
<powershell>
Install-WindowsFeature -Name Telnet-Client
</powershell>
This example installs the Telnet Client feature during the VM initialization process.
Virtual Machine details page
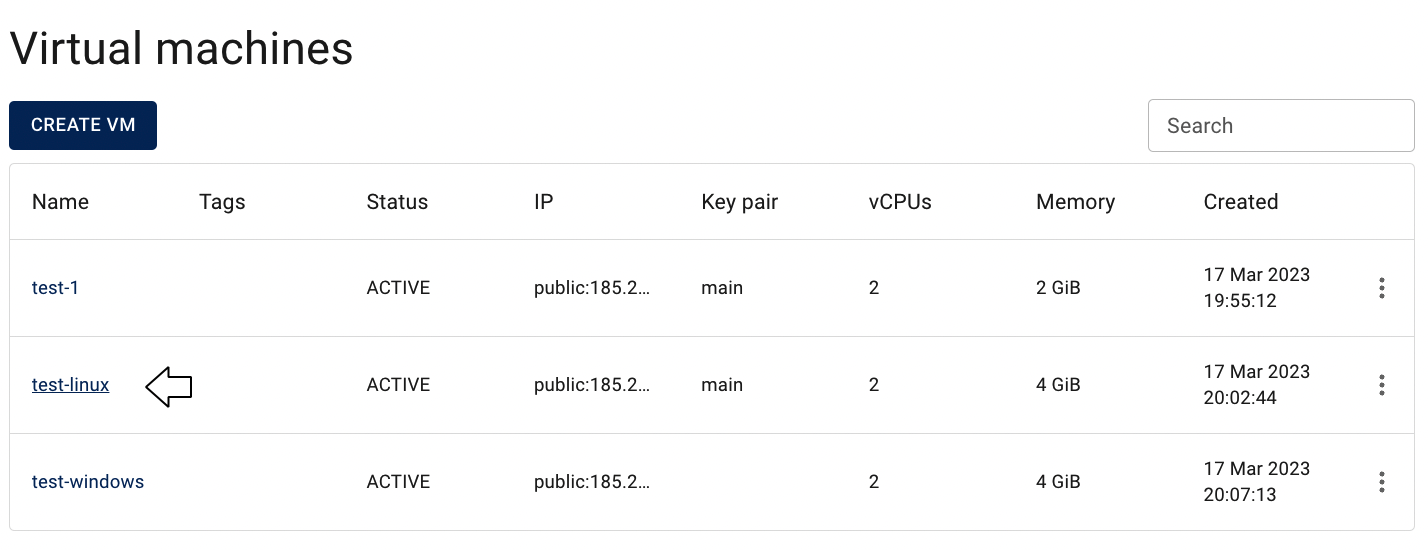
To open the Virtual Machine details page, click on the Name of the corresponding Virtual Machine:
This action will redirect you to the Virtual Machine details page, where you can find:
- VM details area with actual information about it - name, ID, public IP, region, status, memory and image that was used for VM’s creation:

panel with available quick actions:
- Start - boots the VM if it is currently shut off or shelved;
- Reboot - reboots power cycles the VM;
- Shutoff - stops the VM while keeping its resources (CPU, RAM) reserved on the hypervisor;
- Shelve - deallocates the VM and releases its resources (CPU, RAM) from the hypervisor;
- Edit - allows to rename the VM anr set tags fot it;
- Remote console - opens a web-based remote console to access the VM directly;
- Additional Actions:
- Resize - changes the VM’s flavor;
- Download RDP File - available only for Windows VMs; downloads a Remote Desktop Protocol file to enable remote connection;
- Delete - permanently removes the VM.
transition to the NETWORKS & SECURITY, VOLUMES, SNAPSHOTS and LOG pages related to this VM:

NETWORKS & SECURITY TAB - opens the Networks & Security page where you can find all available Interfaces and Security Groups (Firewalls) of corresponding VM, add new Interface or/and Firewall, associate Floating IP and manage this services.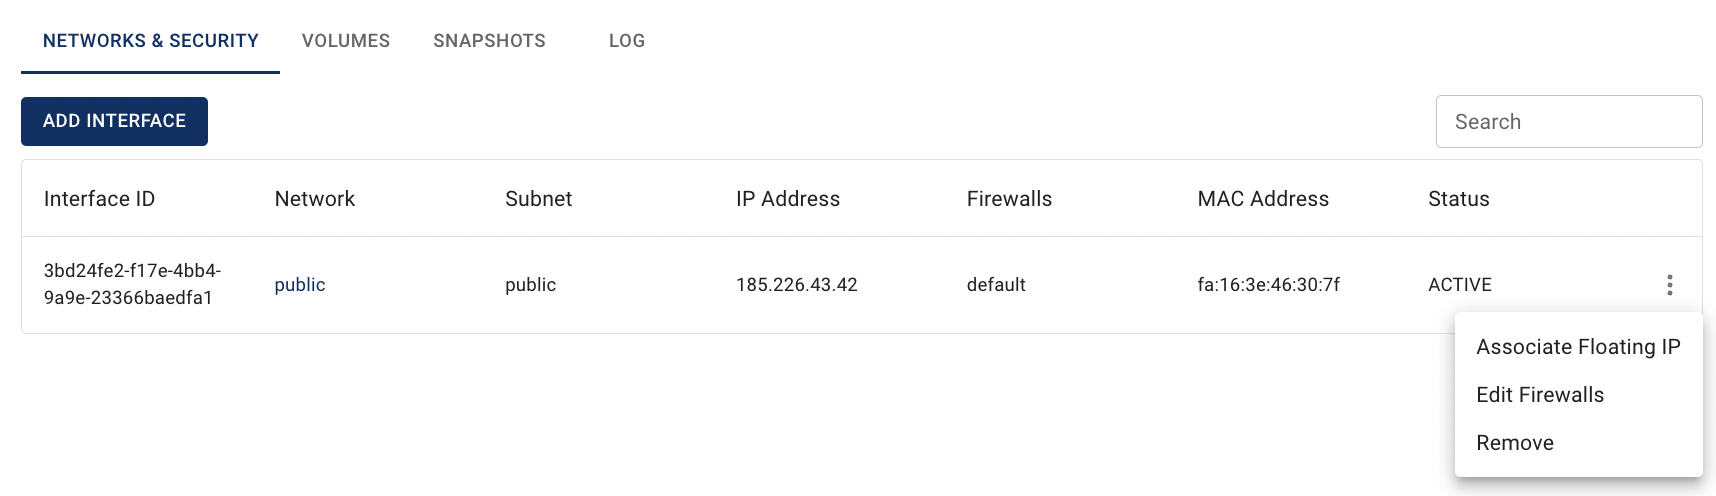
💡 To find additional information about Networking and Security and how to manage them through this TAB use the articles: VM’s Firewalls, VM’s Networks and Interfaces.
VOLUMES TAB - opens the Volumes page where you can find all attached volumes of corresponding VM, and also attache new one and manage them.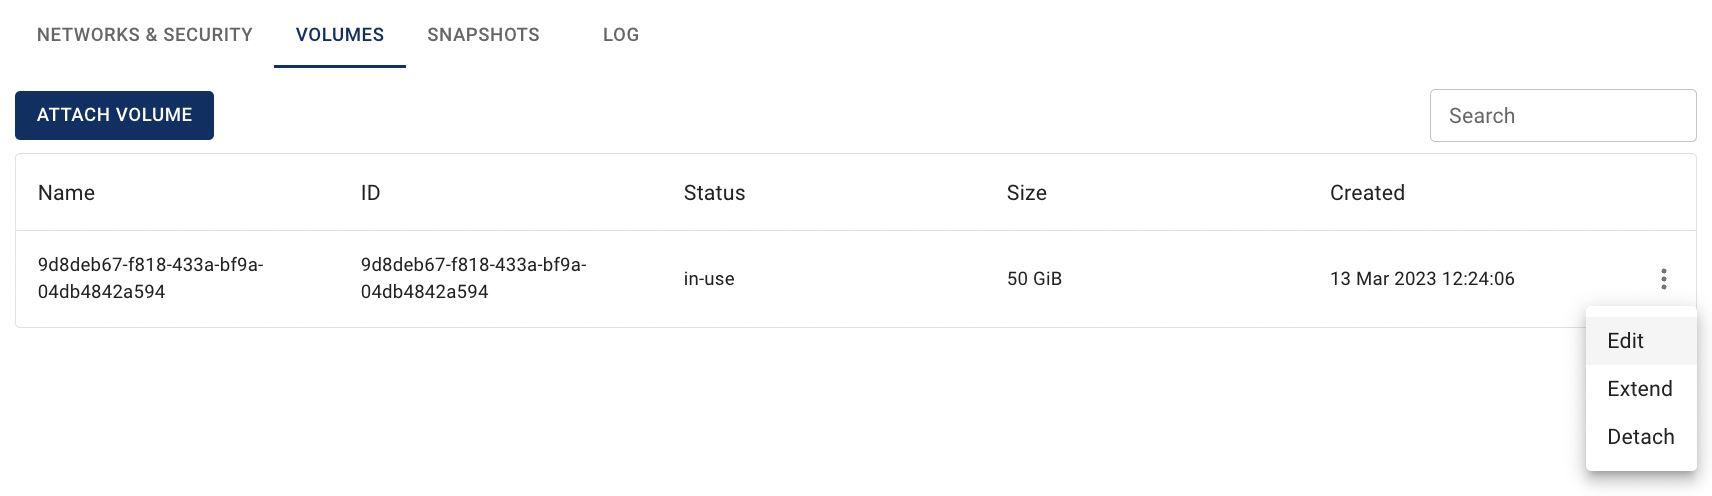
💡 To find additional information about volumes and how to manage them through this TAB use the articles: VM’s Volumes.
SNAPSHOTS TAB - opens the Snapshots page where you can find all available snapshots of corresponding VM, create new one and manage them.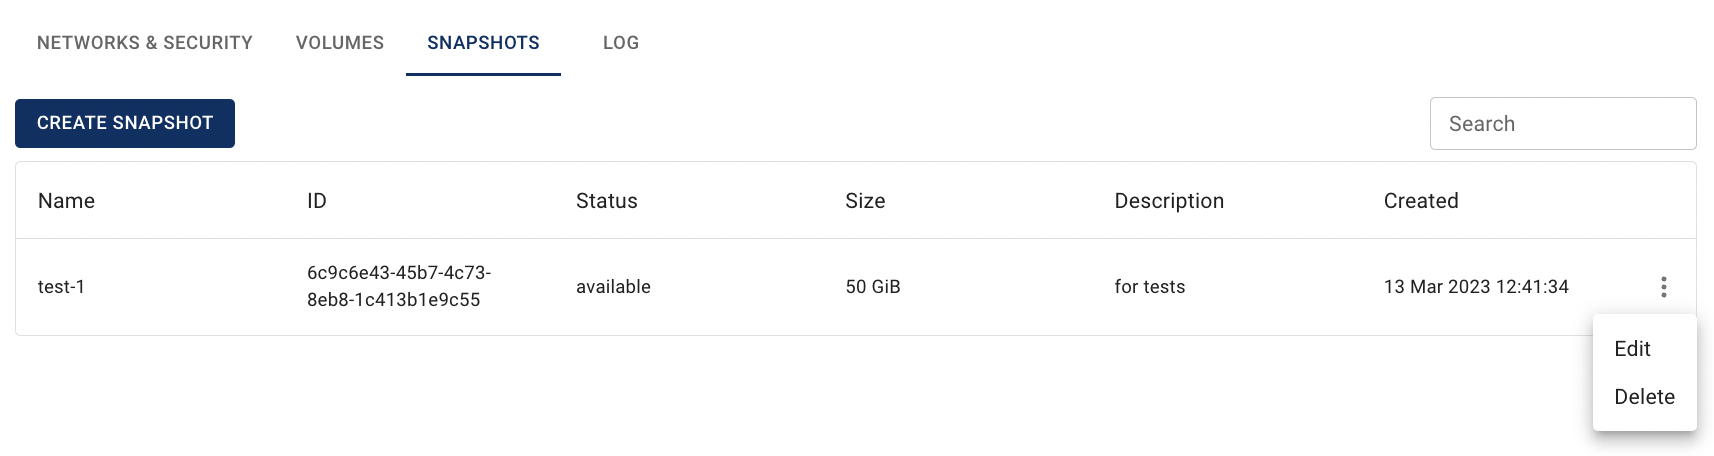
💡 To find additional information about snapshots and how to manage them through this TAB use the articles: VM’s Snapshots.
LOG TAB - opens the Log page where you can find VM’s logs.

ACTION LOG TAB - opens the Action Log page, which shows the history of actions performed on this VM.

Download RDP File
📌 This option is available only for Windows VMs and is used to download RDP file for the remote connection to the Windows VMs.
To download RDP for the remote connection to the Windows Virtual Machine, do the following:
- identify Windows Virtual Machine, for what you want to download RDP file on the Virtual Machines page;
- click on the Actions icon and select the Download RDP file in the list of available options.
After these steps, the RDP File of the selected Windows Virtual Machine will be downloaded.
Alternatively, you can download RDP file from Virtual Machine details page, by clicking on the appropriative quick actions icon there:

Activate/Deactivate Interface
💡 Activating or deactivating an Interface allows to temporarily enable or disable network connectivity for a Virtual Machine without deleting the Interface itself.
To activate or deactivate the Interface of the selected VM, do the following:
- identify the required Interface on the NETWORKS & SECURITY tab of the selected VM details page;
- click on the Actions icon and select Activate interface or Deactivate interface from the list of available options;
- confirm your action in the next opened Confirmation window.
After these steps, the selected Interface will change its status accordingly — UP when activated, or DOWN when deactivated:

💡 To find additional instructions and information VM’s Interfaces use the articles: VM’s Networks and Interfaces.
Associate/Disassociate Floating IP
📌 This option is available only for VMs created in the internal network with an configured external Router.
To associate Floating IP with the Virtual Machine, do the following:
- ensure that you have configured Router with enabled external gateway, which is attached to your internal Network.
💡 To find information about how to create and configure Router use the article Routers; - ensure that you have created Floating IP and it isn’t already associated with other cloud Resources.
💡 To find information about how to create Floating IP use the article Floating IPs; - identify Virtual Machine created in the internal network, that you want to make publicly available from the Internet on the Virtual Machines page;
- click on the Actions icon and select the Associate Floating IP in the list of available options;
- choose one of the available internal interfaces of your VM and one of the previously created Floating IP that you want to attach to the selected interface on the opened Associate floating IP and click on the ASSOCIATE icon:
After these steps, the selected virtual machine will be publicly available: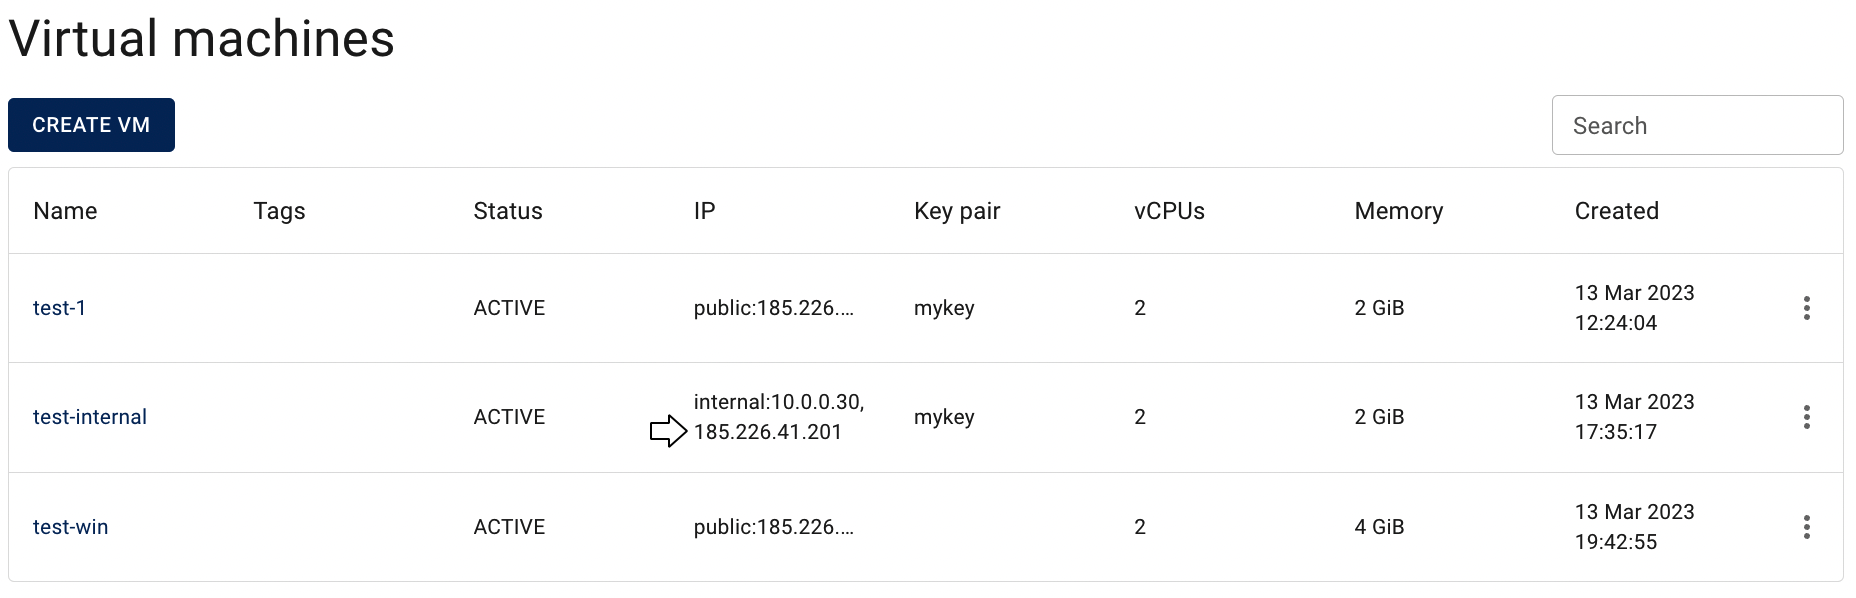
Now, if you want to close the access from Internet to this VM again, do the following:
- click on the Actions icon and select the Disassociate Floating IP;
- confirm your action on the next opened Confirmation window by clicking on the DISASSOCIATE icon.
After these steps, the selected Virtual Machine will be again publicly unavailable.
Alternatively, you can associate/disassociate floating IPs from the NETWORKS & SECURITY TAB on the Virtual Machine details page:
💡 To find additional instructions and information about Floating IPs and VM’s Interfaces use the articles: Floating IPs, VM’s Networks and Interfaces.
Edit Virtual Machine
To edit the Virtual Machine, do the following:
- identify Virtual Machine, that you want to edit, on the Virtual Machines page;
- click on the Actions icon and select the Edit in the list of available options;
- update the Virtual Machine Name aor/and add tags to the selected VM on the opened Edit Virtual Machines window and click on the SAVE icon.
After these steps, the selected Virtual Machine will be updated.
Alternatively, you can edit virtual machine from its Details page, by clicking on the appropriative quick actions icon there:

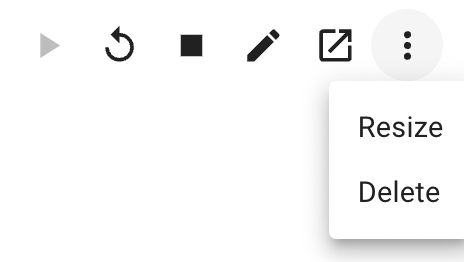
Resize Virtual Machine
To resize the Virtual Machine, do the following:
- identify Virtual Machine, that you want to resize, on the Virtual Machines page;
- click on the Actions icon and select the Resize in the list of available options;
- choose new flavor for the Virtual Machine on the next opened Resize Virtual Machines window and click on the SAVE icon;
- verify resize by clicking again on the Actions icon and select additional option - Confirm resize
When the VM’s status changes from RESIZE to VERIFY_RESIZE, you can confirm or revert your action, just click again on the Actions icon and select one of the additional options - Confirm resize or Revert resize:
If you confirm resizing, the selected virtual machine will be resized after a few minutes and its status will be ACTIVE.
Alternatively, you can resize virtual machine from its Details page, by clicking on the appropriative quick actions icon there:

Shutoff Virtual Machine
ℹ️ Shutoff keeps VM resources (CPU, RAM) reserved on the hypervisor.
🔔 You’ll still be charged, but the VM can be restarted faster.
To shutoff the Virtual Machine, do the following:
- identify Virtual Machine, that you want to shutoff, on the Virtual Machines page;
- click on the Actions icon and select the Shutoff in the list of available options;
- confirm your action on the next opened Confirmation window.

After these steps, the virtual machine status will change to SHUTOFF:

Alternatively, you can shutoff virtual machine from its Details page, by clicking on the appropriative quick actions icon there:

To start again Virtual Machine click on the Actions icon and select the Start in the list of available options.
Shelve Virtual Machine
ℹ️ Shelving will release all VM resources (CPU, RAM) on the hypervisor.
🟢 You won’t be charged, but restarting the VM may take longer.
To shelve the Virtual Machine, do the following:
- identify Virtual Machine, that you want to shelve, on the Virtual Machines page;
- click on the Actions icon and select the Shelve in the list of available options;
- confirm your action on the next opened Confirmation window.

After these steps, the virtual machine status will change to SHELVED:

Alternatively, you can shelve virtual machine from its Details page, by clicking on the appropriative quick actions icon there:

To start again Virtual Machine click on the Actions icon and select the Start in the list of available options.
Start Virtual Machine
To start the Virtual Machine which is in SHUTOFF or SHELVED status, do the following:
- identify Virtual Machine, that you want to start, on the Virtual Machines page;
- click on the Actions icon and select the Start in the list of available options:

After these steps, the virtual machine status will change to ACTIVE.
Alternatively, you can start virtual machine from its Details page, by clicking on the appropriative quick actions icon there:

Delete Virtual Machine
To delete the Virtual Machine, do the following:
- identify this unnecessary Virtual Machine on the Virtual Machines page;
- click on the Actions icon and select the Delete in the list of available options;
- confirm the Virtual Machine deletion on the next opened Confirmation window.
After these steps, the selected Virtual Machine will be deleted.
Alternatively, you can delete virtual machine from its Details page,, by clicking on the appropriative quick actions icon there:

Backup Virtual Machine
Please be aware that Backup feature in the Cloud Console is currently in beta. This means it has not been fully tested across all use cases but aims to provide a user-friendly way to manage backups for your VMs. If you’re willing to accept the associated risks of using a beta service, you’re welcome to proceed. Rest assured, customer support is readily available for any questions or issues you may encounter.
Now, in the Cloud Console you have the option to set up regular backups for your virtual machines by creating a backup workload and assigning the virtual machine to it.
The VM will be backed up according to the workload’s schedule. If the schedule is turned off, you can still perform a manual one-time backup. However, to perform any backup, the VM must be assigned to a specific backup workload.
To get to the Backup Workloads page, select the Backups from the VIRTUAL DATACENTER block in the side-bar menu:

On this page you can find all created Backup Workloads in the current Project, with the Create button, Search bar and Actions icon, which opens a list of available management actions for the selected workload.
Additionally, from this page, you can navigate to the detail page of each created workload by clicking on its name. There, you will find detailed information about its policy and schedule and gain access to backup and restore options, among other management actions for the selected workload:

More information about backup workloads you can find here - Backup Workloads.
Restore Virtual Machine
Please be aware that Restore feature in the Cloud Console is currently in beta. This means it has not been fully tested across all use cases but aims to provide a user-friendly way to manage backups for your VMs. If you’re willing to accept the associated risks of using a beta service, you’re welcome to proceed. Rest assured, customer support is readily available for any questions or issues you may encounter.
If your VM is assigned to a Backup Workload and has a successfully created Backup, you can restore it when needed with the same settings and data.
The restore process will return the VM to its previous state, including the same project, network, image, and key pair. However, you can assign a new name and flavor to the restored VMs during the process.
To get to the Restores page do the following:
Open the Backup Workloads page - select the Backups from the VIRTUAL DATACENTER block in the side-bar menu:
Navigate to the Workload details page by clicking on the desired workload name:

Select CREATED BACKUPS TAB on the opened Workload details page:

Navigate to the Backup details page by clicking on the desired backup name:

Select RESTORES TAB on the opened Backup details page:

On this page you can find all records of the restore operation initiated from the current Backup, with the Restore VM button, Search bar and Actions icon, which opens a list of available management actions for the selected Restore:

More information about restores can be found here - Restores.